

Today, we continue our series on creating photo projects from within Apple Photos, with a tutorial on the MILK books extension. This is a great way to seamlessly create, design, and print your books if you’re a fan of MILK books (and who isn’t?). Our recurring guest blogger, Leanne Lobe of Liv Mondo Book Design Studio, gives you every step from start to finish, so that you can try this workflow in your own digital life. If you’re not sure what the content of your books should be, check out our posts on Mom guilt projects, 8 steps to success, or how to add humor to a book!
How to Create Photo Books with MILK Books inside of Apple Photos
Apple no longer prints or produces photo books or calendars, BUT still allows you to create and purchase third-party projects through printing companies all from within Apple Photos. You can still effortlessly jump between your photo library and your projects without ever leaving Apple Photos. It’s truly seamless and makes the design process way more efficient. Today we’re creating a photo book project using MILK Books.
Let’s get started!
This tutorial walks you through the key elements of creating a photo book using MILK Books:
- Installing the MILK Books extension in Apple Photos
- Creating a new photo book project
- Exploring MILK Books
- Customizing your layouts
- Modifying your text
- Ordering your photo book
Step 1: Confirm that MILK Books is installed in Apple Photos
Before you can begin your photo project, you need to have MILK Books installed in Apple Photos. Not sure if you do? It’s easy to check by accessing the Create menu.
Use one of these three methods to access the Create menu:
- Click on File at the top of the window, OR
- Right-click on a photo, album, or memory, OR
- Click on the little plus sign beside My Projects (left panel)

One way to access the CREATE menu is to click the plus sign in the circle beside “My Projects” in the left panel.
Use the Create menu to check if you have MILK Books installed:
-
- Hover over Create to open the projects sub-menu
- Hover over one of the project options to open the extension sub-menu
- If you don’t see MILK Books on the list and need help installing it, read our detailed tutorial to learn how to install the MILK Books extension in Apple Photos.
- If you see MILK Books on the list, you’re ready to begin!
Not sure if you have MILK Books installed? Check the CREATE menu to confirm. When you see it in the list (above) then you’re ready to start! If you don’t see it on the list, read our tutorial to learn how.
Step 2: Create a New Photo Book Project
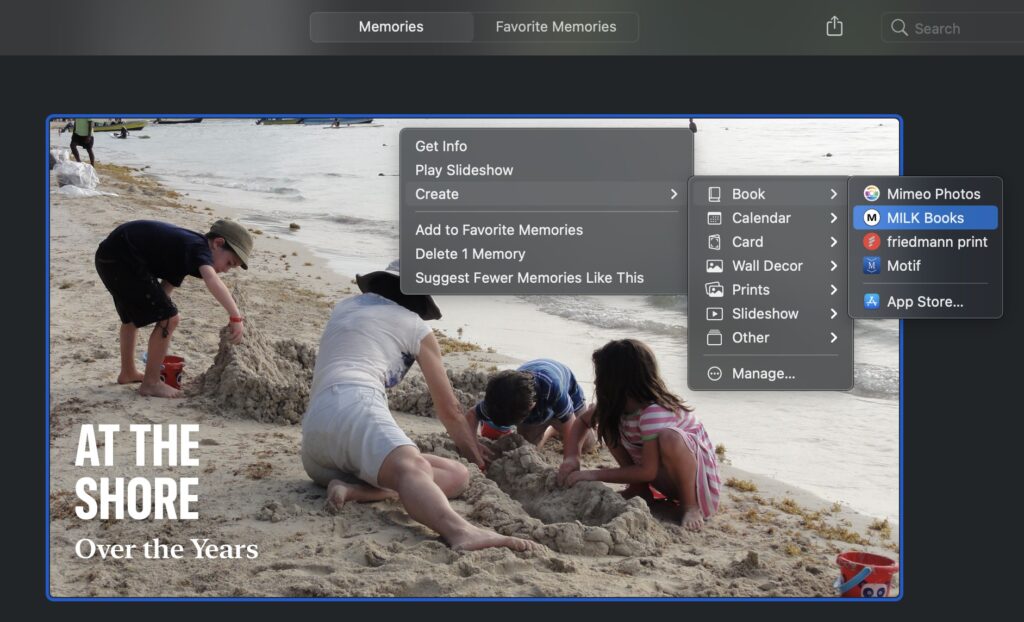
Now that you have MILK Books installed, you are ready to create a new photo book project. Open the Create menu, using one of the three methods mentioned above.
To start a new MILK Books photo book project:
-
- Hover over Create to open the projects menu
- Hover over Book to open the extension menu
- Click on MILK Books
Choose your photo book format, size and layout
When you click on MILK Books in the Create menu, you will see a dialogue box appear prompting you to choose the size and cover type of your photo book. There is no right answer; it will depend on the subject and audience of your photo book.
You will open a window asking you to choose from MILK Books format options listed below. When you select any of these options you will be prompted to choose the size and layout (square, landscape or portrait).
- Classic Photo Books
- Premium Photo Books
- Classic Photo Albums
- Premium Photo Albums
- Premium Leather Photo Albums
- Moleskine Photo Books
You will not be able to modify these choices so take the time to explore the differences at MILK Books to find the right one for your project before you begin.

With so many options you can find a great choice for your project, but do your research first because you cannot alter these choices without starting over.
Choose your photo book cover and paper
One more set of decisions to make before you start designing. With your photo book format, size and layout selected it’s time to choose your cover and paper. At the bottom click on “Fabric”, “Paper” or “Cover” to see the available options for the photo book format you previously selected. Your choices will be immediately shown in the main window. At this stage you can also add additional pages, by moving the slider at the top panel to the right, but you can always add more pages when you are in the design mode.
If you want MILK Photos to automatically place your photos, then ensure the Auto fill my project button (bottom right) is checked. Regardless of what you choose, once you are in the design mode, you may choose to auto fill at that time or clear your book.
All of the options at this stage can be modified at any time once you have started designing your photo book. When you’re ready, click the blue Create button at the top right of the window.
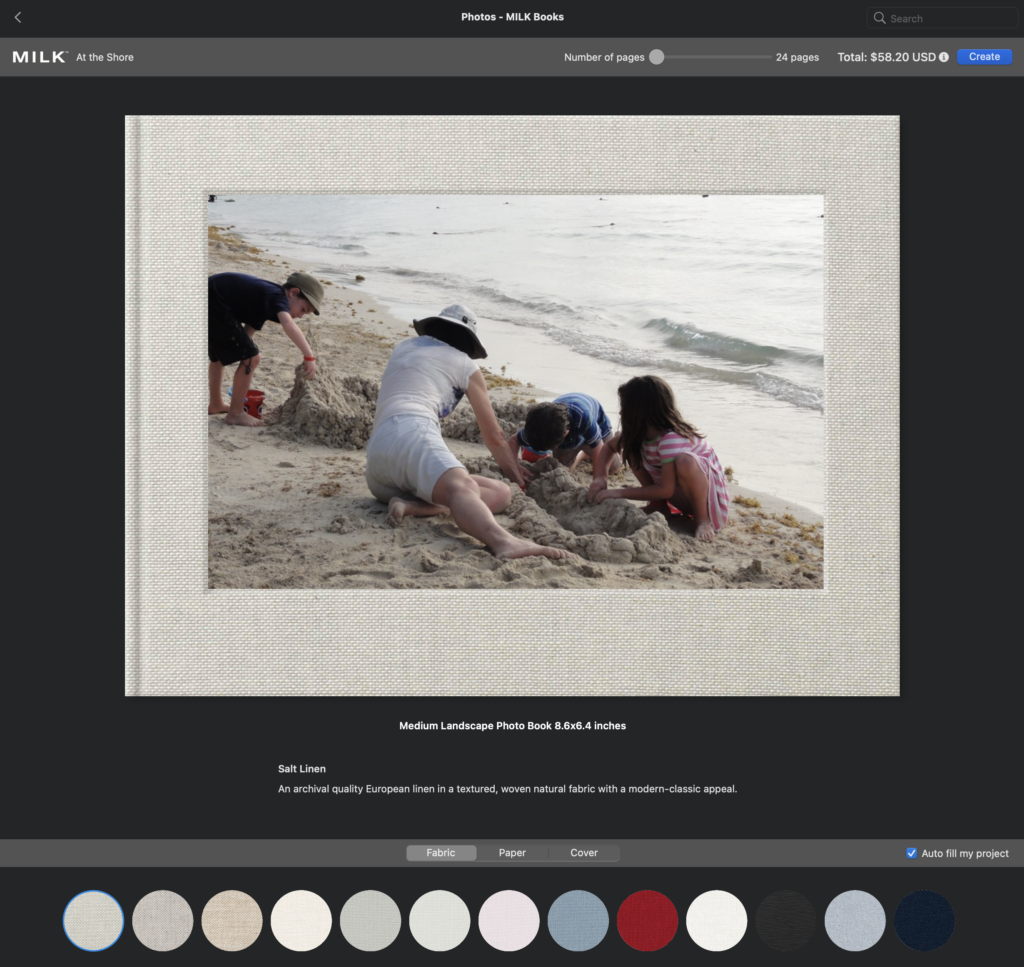
Choose your cover details (fabric and design) as well as your paper. You can modify these choices at any time. Click the blue Create button (top right) when you’re ready to start designing your book.
Step 3: Explore MILK Books
Your new photo book will open in the Apple Photos main window where you normally see your photos. If you chose to have MILK Books auto fill your book, you will see the pages filled with photos. Otherwise, it will appear with a mix of blank layouts as pictured below, ready for you to start designing. MILK Books has some tools so you can customize your design. Let’s take a tour so you know where to find everything.

MILK Books design window opens to Grid View so you can see multiple pages. Your MILK Book tools are organized in three panels: top, right side and bottom. Read below for details.
Find your tools in MILK Books
Top panel tools

Top panel of tools in MILK Books listed below from left to right:
- Zoom slider
- Increase or decrease the size of the page in the main window
- Active only when in Grid View (all pages)
- Undo and redo buttons
- Add pages
- Note you can only add 2 pages at a time
- Book View modes
- Grid View (drag and drop pages to change their order, edit layouts)
- Spread View (two-facing pages only to allow for focused editing)
- Preview (flip the pages to see how it will print)
- Settings
- Access the window to change your cover, paper and fabric
- Info
- Learn more about your photo book format
- Help
- Watch the Help video (overview of the design program)
- Contact information
- Shipping information
- Book Stats
- Number of pages in your book
- Estimated pre-shipping price
Right panel tools
The right panel is where you find layout options. When you select a page, you can access all the layout templates from the right panel by selecting the number of images you want on the two pages and then scroll through the available options to make your choice. Click on the two blue arrows to switch the order left-right order of the template.
The right panel is only available in Grid and Spread views.

Choose your desired layout from the many templates provided in the right panel.
Bottom panel tools
You will find your project photos in the bottom panel in addition to the following tools:
- Auto fill book: Let MILK Books automatically place your photos into the book.
- Clear book: Remove all the photos from your layouts. They will still be available in the bottom photo panel.
- Sort by: Choose from three options: “Date Created”, “Placed” and “Unplaced” to keep your workspace tidy.
- Adjust thumbnail size: Use the slider to make the photos in the bottom panel larger or smaller.

Project photos are in the bottom panel. Drag and drop them into place.
Step 4: Customize Your Layouts
MILK Books has a very large selection of designed templates available; however you are not able to modify these templates or create your own. Even within these constraints, there are a few options to enhance your memories:
- Page Layout Options
- Custom Photo Options
- Reposition or Zoom the photo within the photo box
- Edit your photo
Page Layout Options
The only page layout tool you have available is to switch the order of the left and right sides of a template. Select a layout in the right panel and you will see a button with two blue horizontal arrows (below). When you click that button you can change the order of the left and right sides.

Click the blue arrows to switch the order of the left and right pages to customize your layout.
-

- Before
-

- After
Custom Photo Options

Click on a photo to reposition, zoom or edit it using the tools pictured above.
- Reposition the photo within the photo box by clicking anywhere on the photo and dragging it around. It will stay contained within the frame.
- Zoom in or out on the photo by moving the slider back and forth. This is an easy, non-permanent way to “crop” an image.
- Edit your photo by clicking on the pencil icon to:
- Adjust lighting and color
- Retouch blemishes and remove red eyes
- Add filters or vignettes

Enhance your photos without leaving your photo book! Click Done to continue designing your photo book.
Step 5: Modify Your Text
MILK Books has some templates with text boxes; however you are not able to modify or add additional text boxes.
Get started by clicking on the text box in Grid or Spread view and add your text to the white box.
Highlight the text you want to modify:
- Select one of the two available fonts
- Adjust the size
- Change the format: Bold or Italics
- Shift the alignment: Left, Centre or Right

Limited options for modifying the text.
Step 6: Order Your Photo Book
Review your book
Select Preview mode from the top panel to review your book as it will appear when printed.
Order your book
When you have designed your layouts and edited your text, it’s time to order! Very exciting. Luckily, MILK Books makes this step easy. As you add or remove pages from your book you will notice these changes reflected in the price, so there are no surprises. MILK Books will also warn you of any issues which may affect the quality of your book, including poor resolution, empty image boxes, and blank pages. You can return to your book and fix them or acknowledge these warnings before you can proceed to purchasing the book.
If you have no warnings or you have accepted them, you may be prompted to create a MILK Books account (pictured below). From this point on just follow the steps and prompts through to final payment.

Create a MILK Books account easily using your Apple ID.
Congratulations! Soon you will be able to enjoy your memories from the comfort of your favorite chair and easily flip through the pages reliving those treasured moments. Enjoy that moment!

I’m a Perfect Pinnable!
Feeling overwhelmed by all the options and want someone to make your photo book for you or guide you through the process?
Sign up below to connect directly with Leanne:
Photos Courtesy of Leanne Lobe


