

If you are an Apple user, you may already use iCloud to back up your data… but what about your iCloud Photo Library? Are you familiar with it? It’s a handy service that you can use to automatically gather all your photos and videos from multiple devices to create a single library on the cloud. With this post, we’d like to guide your through some steps on how to use iCloud Photo Library for organizing your memories as well as how to connect it to Apple Photos! Enjoy!
What is iCloud Photo Library?
iCloud Photos syncs your photo and video library across your devices to be able to browse, edit, share and download items from your collection anywhere. It also offers the option of storing full resolution photos on iCloud and keeping lower resolution copies on your device. This way you can save some storage space from the devices that you use daily, such as your phone.
It’s important to keep in mind two important aspects when deciding to use iCloud Photos:
- It counts against your iCloud storage. Everyone signing up for iCloud for the first time receives 5GB free storage. If you want to store a large photo collection on the cloud, you will need to upgrade to a larger storage plan. Learn how to make the best use of your iCloud storage in our previous post.
- Edits and changes you make on any of your devices will be synced on the other devices. For this reason, it’s important to consider an alternative back up system to make sure your memories stay safe.
Setting up iCloud Photo Library
On your iPhone, you can set up iCloud Photos from your settings. When you turn it on, it will take some time for your photos and videos to upload depending on the size of your collection.
Once it’s done, you will be able to access, search, and share your photos and videos on any of your Apple devices, as well as by visiting your iCloud account on a web browser. Imagine it as one large photo and video library bringing together all your memories from all devices in their original format. And what’s more, you can access and manage them from anywhere.

On your iPhone, turn on the iCloud Photos feature from Settings / iCloud / Photos.

On your Mac, go to System Preferences / iCloud / Photos.
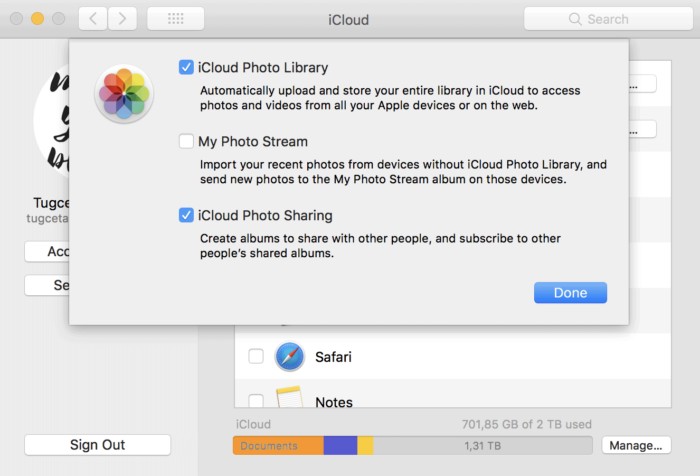
Then, turn on iCloud Photo Library to upload your entire photo library from your Mac to the cloud so that you can access it from your other Apple devices or through the web browser version.
You can also download the iCloud for Windows and set up iCloud Photos on your PC.
Optimizing Your Storage
Your photo and video memories generally have a dramatic impact on the storage of your phone and computer. By using iCloud Photos, you can save some space on your devices. Just choose the option to save high resolution originals on the cloud and low resolution copies on your devices.

To save space on your iPhone, go to iCloud and select “Photos.” Then you can choose the option to “optimize iPhone storage.”

To optimize the storage space on your Mac, launch the Photos app, go to Preferences and select iCloud.
When you select the “Optimize iPhone Storage” option, this means your original photos and videos with high resolution will be kept on iCloud. When you select “Download and Keep Originals,” that means all of your high resolution photos and videos remain on your phone or computer.
It always makes sense to keep the originals in full res on at least one of your devices. This would ideally be your computer where you would have a less problem with space (rather than your phone). It’s also easy to attach extra storage space in the form of an external hard drive, if you need it. This is one of the most common issues we help clients tackle in our online course DPO PRO: The Ultimate Photo Organizing Masterclass.
Accessing Your iCloud Photo Library
Once you set up iCloud Photos on your devices, you can access your photo library from anywhere with internet access. The most basic way to browse your photo library is to visit iCloud with your web browser.

Visit icloud.com and sign in with your Apple ID to view the content stored on your iCloud. To access your iCloud Photo Library, click on “Photos.”

Here you can browse, search and share your photos stored on iCloud.
The photos and videos stored in iCloud Photo Library are also synced on all your Apple devices where the iCloud Photos feature is on. This means that you can access them with the Apple Photos app on your devices.
It’s important to understand that you may be using Apple Photos, without necessarily using iCloud Photos. Apple Photos is the photo system that comes with your Apple devices, but it may or may not be connected to iCloud based on how it was set up. When using iCloud, all your photos and videos are stored in iCloud and can be accessed from your other devices as well.
When you make an edit or delete a photo on one of your devices or directly on the web browser version of the iCloud, this will be also synced on all your devices. On one hand, this is a practical feature that makes it possible to organize and edit your large online collection of memories from multiple devices. On the other hand, it’s important to understand the difference between syncing and backing up, so that your memories stay safe and that you don’t make mistakes.
Creating Shared Albums with iCloud Photo Sharing
Apple has an iCloud Photo Sharing feature for those who like to share their memories privately with their friends and family members. You can enjoy this feature whether you use iCloud Photos or not. To use this feature, you need to turn it on from the iCloud settings for Photos and ensure to have enough iCloud storage space.

On your Mac, turn on iCloud Photo Sharing from iCloud settings for Photos.

On your iPhone, turn on Shared Albums from iCloud settings for Photos.
Creating a shared album is quite similar to creating an ordinary album on the Photos app of your Mac or iPhone.

To create a shared album on your Mac, launch the Photos app, select the photos you want to share as an album, tap on the share icon at the top and then click on iCloud Photo Sharing.

Click on “New Shared Album” to create a new album and in the new window, name your new album.

Once a shared album is created, you can access it from the Shared Albums tab on the left menu.
There are a few settings of shared albums that you can play with: You can invite people to view your album, allow them to add new photos and videos, and turn on notifications for likes and comments. Shared albums are only accessible by people you invited, but there is also an option to create a public website where anyone with the link can access your album.
Backing Up Your iCloud Photo Library
Your backup strategy for your iCloud Photo Library depends on whether you have an automatic backup already in place for your photo library on your computer, or you prefer a manual backup.
Whatever you choose, first you need to ensure that you have the original full resolution photos downloaded from iCloud Photo Library to your Mac.
On your Mac, launch the Photos app, go to Photos / Preferences / iCloud and select “Download Originals to this Mac.”
By doing this, you will have all your iCloud Photo Library downloaded in original resolution to the Apple Photos app library on your Mac. Therefore, if you already have a backup system in place (such as Time Machine or Backblaze) that also includes the Apple Photos app and library, this will also be automatically backed up.

For manual backups, you can always copy your Photos app library manually by dragging the Pictures folder from your Finder to an external hard drive, for example.
If you want to download only a part of your iCloud Photo Library and back them up manually to an external hard drive, then you can do this from the web browser version.

In the web browser, select the photos you want to download from iCloud Photo Library, click on the download icon at the top right and download either “unedited originals” or “edited photos in most compatible form.”
Remember that, in any case, it’s always advisable to have backups for your photo and video memories in at least three different locations, and cloud storage can be one of them. If you don’t have a backup strategy yet, you can get some ideas from our blog post series on backup basics.
So What Do You Think?
We hope this post helped you to make sense of iCloud Photos. Do you already use it? Let us know in the comments below how you find it! We are always curious to learn about your experiences!


