Creating slideshows is a great way to share photos and videos, but it’s something not everyone knows how to do. Enter this post! As our series on video continues, Selin Tagmat of Mind Your Photos takes you step-by-step though iMovie for Mac to help you create your own slideshow to share with friends and family. iMovie is one of our favorite programs for beginners because it’s so simple to use, and we thought it might be a good place for you to start. So bookmark this page and get creative because today’s we’re making slideshows! Enjoy!
Heard of iMovie?
If you are a Mac user and want to create a nice slideshow to share your photo and video memories with others, this blog post is just for you! Here you will find a step-by-step guide on how to create a slideshow with Apple’s free video editing software iMovie for Mac. Are you also using an iPhone or an iPad? The good news is that iMovie is designed to work together in MacOS and iOS, so you can work on your slideshow across different Apple devices. The Mac version is more powerful with more advanced editing features, so be sure take advantage of that if you can!
If you haven’t already done so, check out our post on How to Create Powerful Video Slideshows to Enjoy Your Memories for some basic tips and tricks before you dive in!

I’m a Perfect Pinnable!
Remember? Slideshow Content First!
Before you actually start creating your slideshow with a video editing tool, it’s always good to do some preparation work – deciding on your slideshow concept, thinking of an outline, and preparing the content will help you save time in the creation process and ensure that you have a good flow in your slideshow. Don’t miss this step!
In this tutorial, I made the following preparations for my slideshow:
- Slideshow concept: I will prepare a 3-minute video slideshow to share weekend trip photos and videos with friends. The slideshow will have a fun, uplifting and adventurous style and will be shown on a TV.
- Outline: I want to tell the story like a travel diary – from the beginning of the trip to the return, highlighting changing moods with different light conditions and locations.
- Content: I will use a selection of 43 photos and 3 videos that are gathered in a dedicated album in my Photos for Mac library.
For a more detailed overview of this preparation process, along with some useful tips to keep in mind when you are creating your slideshow, you can take a glance at my previous blog post.
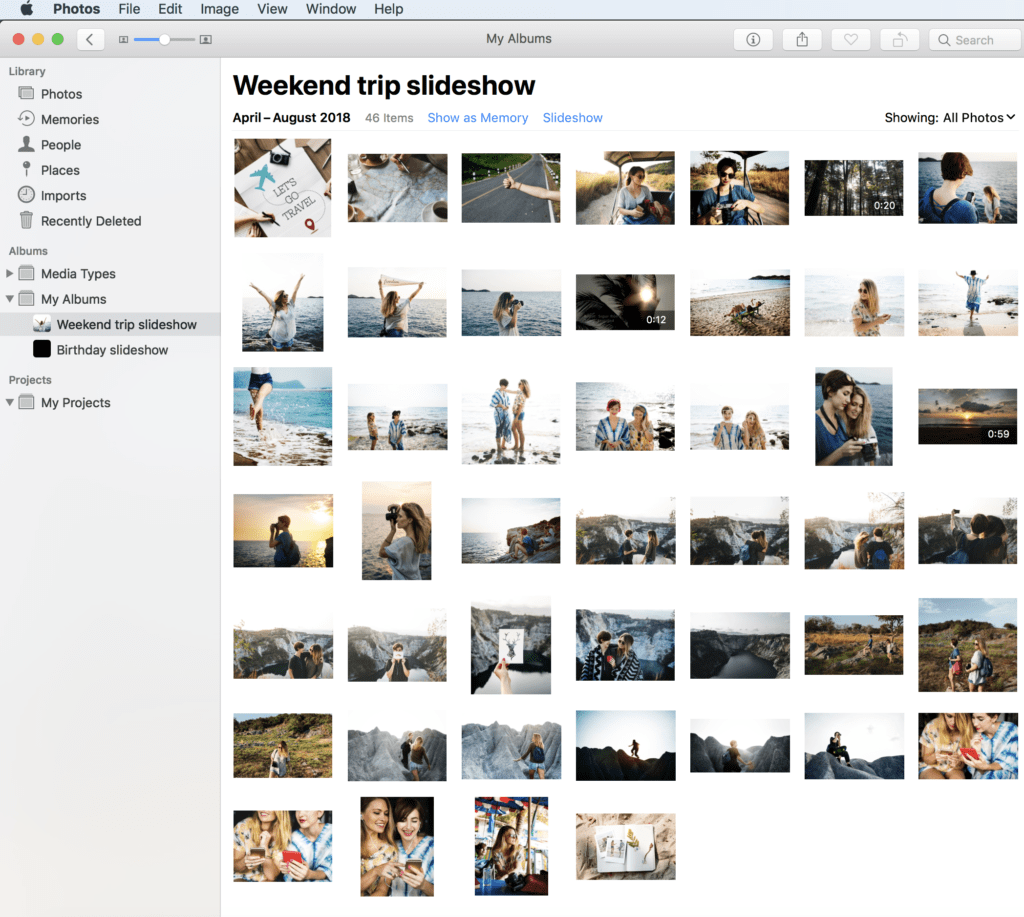
This is how my slideshow content looks like in a dedicated album in Photos for Mac. Before starting, I arranged them in the order I want to see them in my slideshow. Ready to be imported into iMovie!
Your iMovie Slideshow in 10 Steps
Here’s a 10-step tutorial on how to create your own slideshow with iMovie for Mac.
#1 Create a New Project
When you open iMovie, click on the Projects button – that’s just between Media and Theater – at the top center of your screen – and then click Create New. At this point, iMovie gives you the option to create short and fun Hollywood-style trailers with some ready made templates. Select Movie instead, to create a slideshow with the combination of photos, videos, and music. It offers more flexibility and features, and that’s what we’ll be using today. iMovie offers a variety of movie templates too, but in this tutorial, I preferred to go for no theme to show you the editing features that will help you to create your own theme.
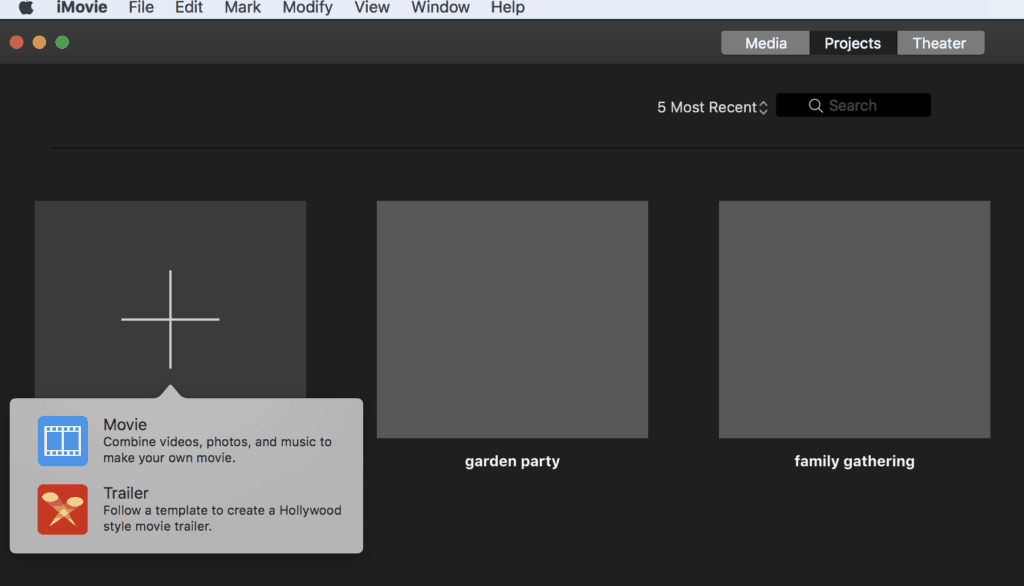
This is the first screen you will see when you open iMovie.
Here is a quick terminology lesson on the iMovie video editing screen, so that we speak the same language:
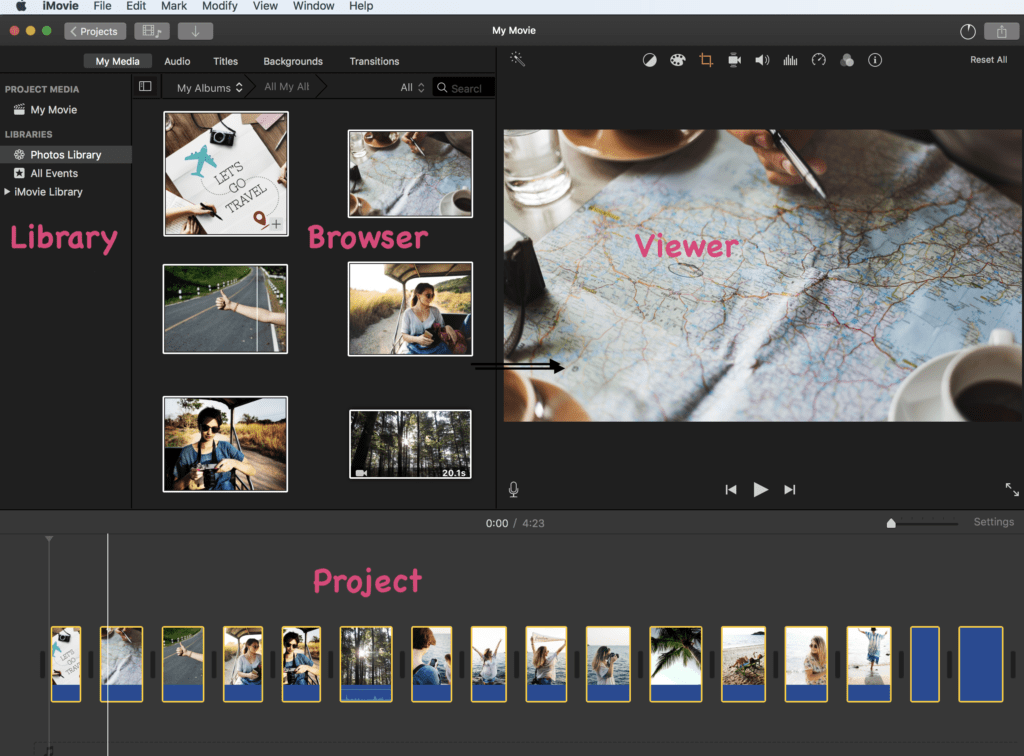
iMovie is made up of a Library pane, a Browser, a Project pane, and a Viewer.
#2 Import Photos & Videos
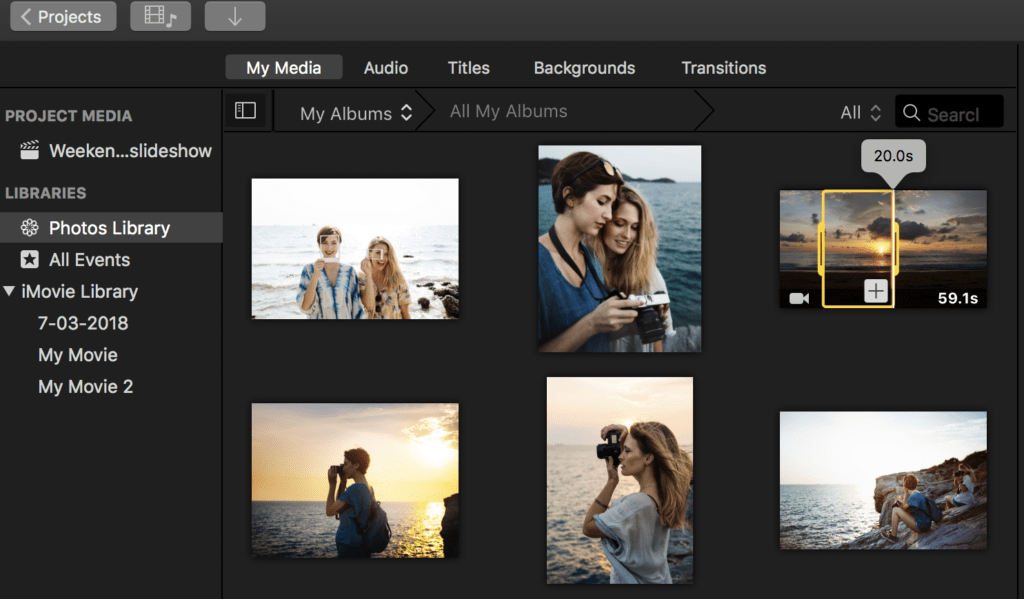
If you want to import your content from an album in the Photos app (like me), click on the Photos library link. Be sure that you are on My Media section at the top menu of the Browser pane and not on Audio, Titles, Backgrounds, or Transitions sections; otherwise you will not see the Photos library.
Then on the Browser pane, select My Albums from the dropdown menu and open your album. Select all the photos and videos that you want to import into iMovie. Drag and drop them on the Project pane.
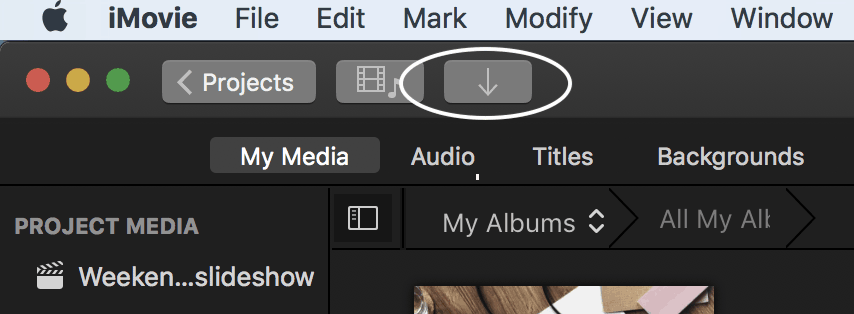
If you need to import content at any time and from any other location, you can do so by clicking on the import button.
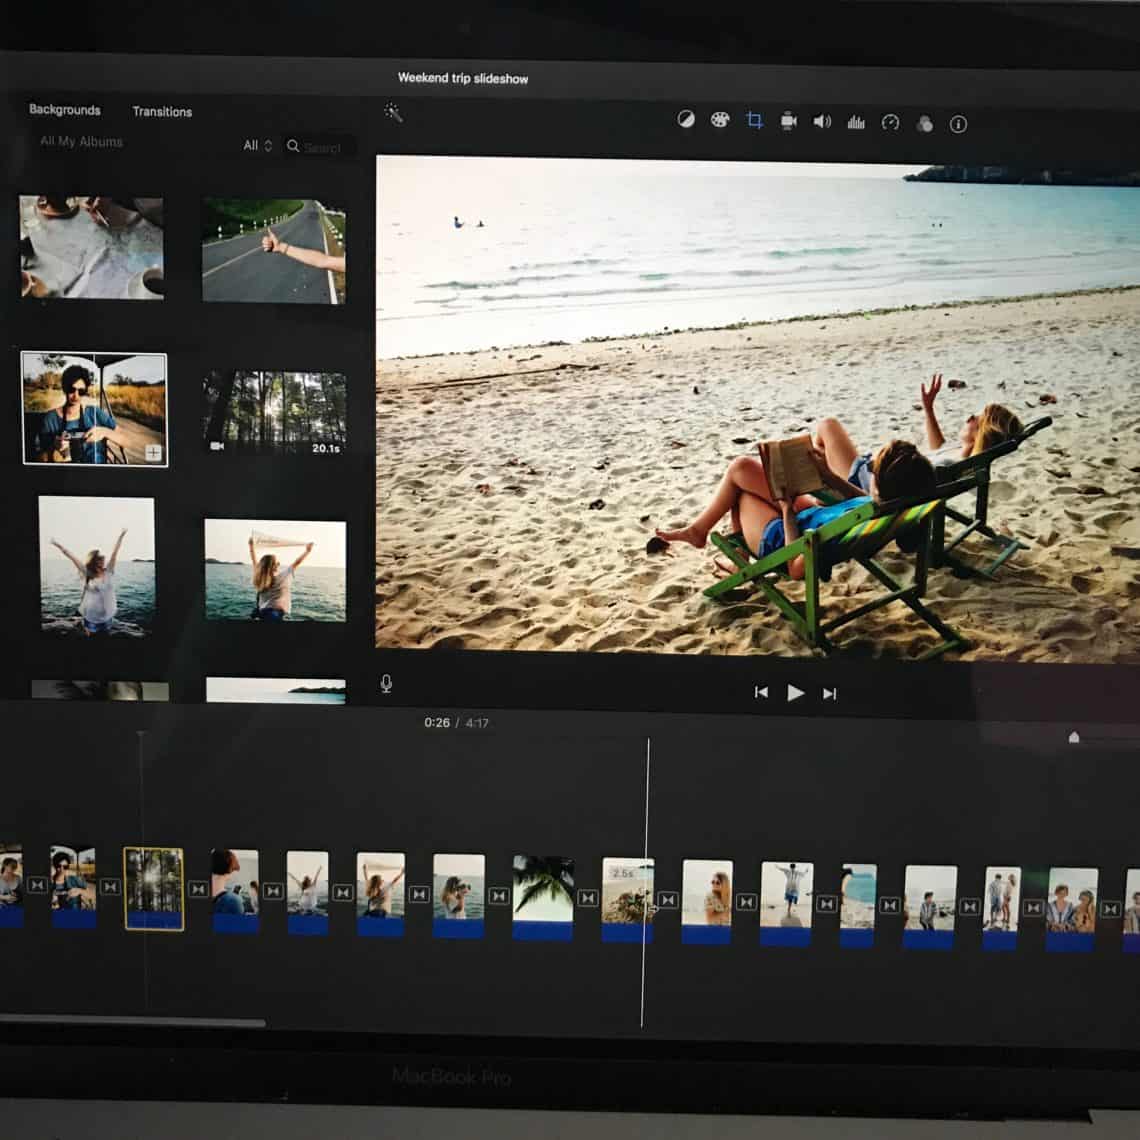
#3 Arrange and Edit Your Photos & Videos
Once you are done importing your photos and videos, play your project in the Viewer to see if all the content is in order. You can change the order of your photos and videos on the Project pane by simply dragging them from one point on the timeline to another one. Want to get rid of a photo or video? Simply click on it with two fingers and select Delete.
I absolutely recommend you to edit your photos and videos according to your usual editing workflow before starting the video editing process. You’ll have more options that way.
At the video editing stage, you can still fine-tune your photos and videos with some extra editing options available on the Viewer pane. You can use the magic wand on top (left) to automatically improve the quality of your photo. The other options let you work on the color balance, do some color correction, crop your photos, and add filters. You can reset all adjustments you have made and return to the original version at any time if you like.
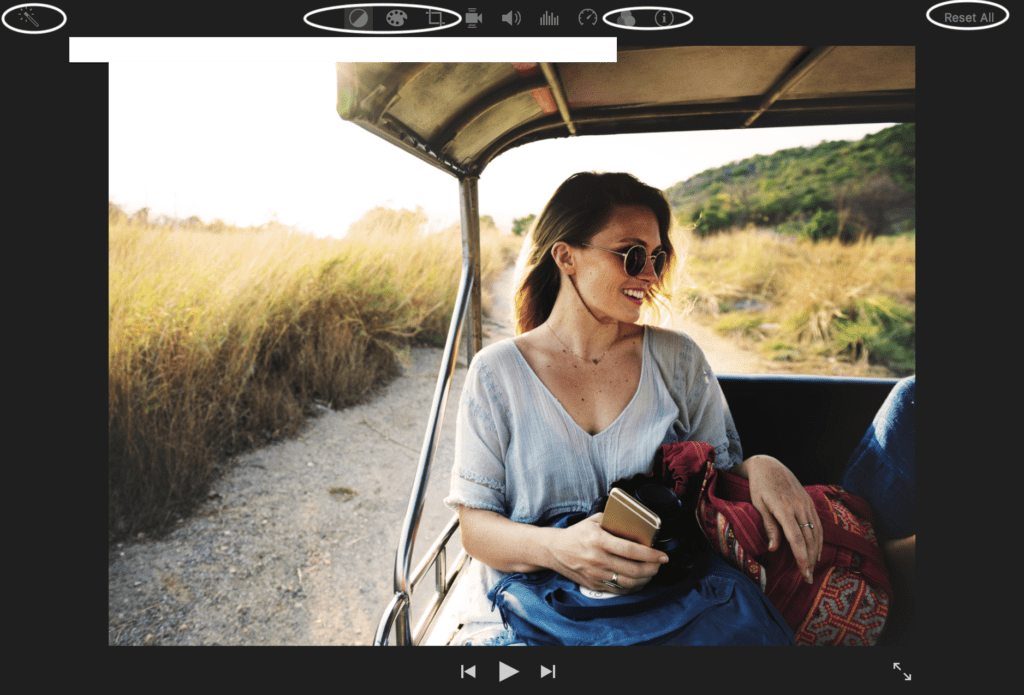
Adjust your photos and videos with the top menu in the Viewer pane.
You will see four more options appear when you play a video clip in the viewer. Here you can stabilize shaky videos and correct image distortions from when the camera moved a lot during recording, or if the camera recorded fast motion (known as rolling shutter distortion). You can also correct and enhance audio, which I advise you to do once you start working with the music and audio settings (in the next steps). And last but not least, you can slow down or speed up your video clip.
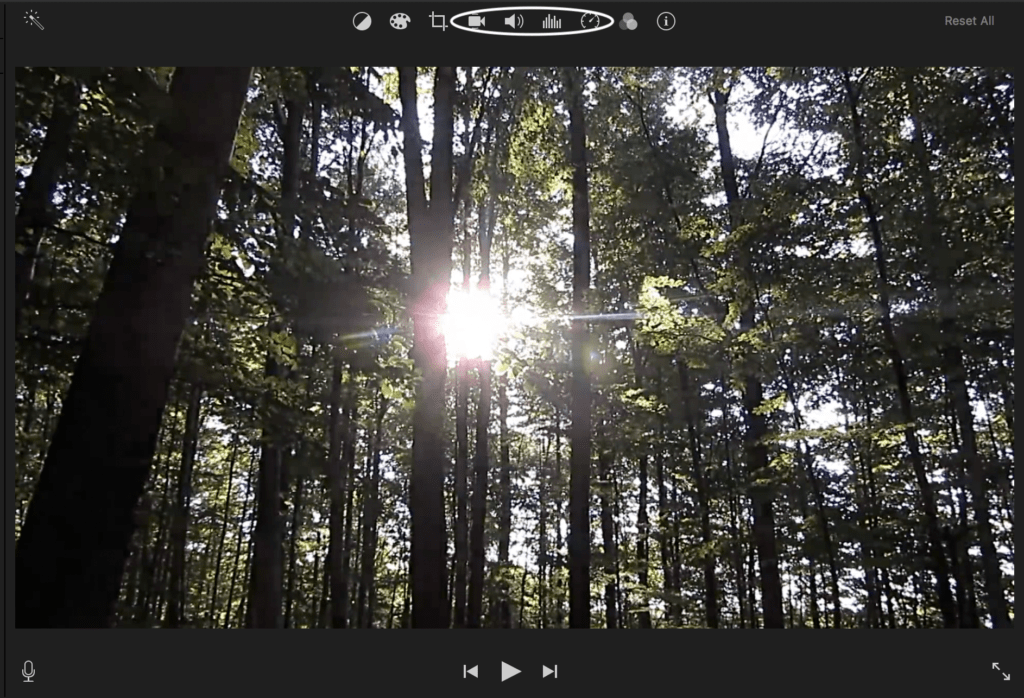
When playing a video, more options will appear in the top menu.
#4 Trim and Split Video Clips
You might want to trim some of the footage that you find to be longer than desired. You can do this from the Browser pane or the Project pane.
Cut out the footage you don’t need!
You can trim your video clip in the Browser pane by clicking on it and adjusting the desired length from the beginning and the end by moving the yellow frame from both sides. Then drag and drop the trimmed video into its place in the timeline (in the Project pane). The original will remain in the Browser pane. You can trim another part to reuse again if you like. Alternatively, you can trim the video on the project timeline itself by clicking on the video and adjusting the white frame from both sides to the desired length (see below).
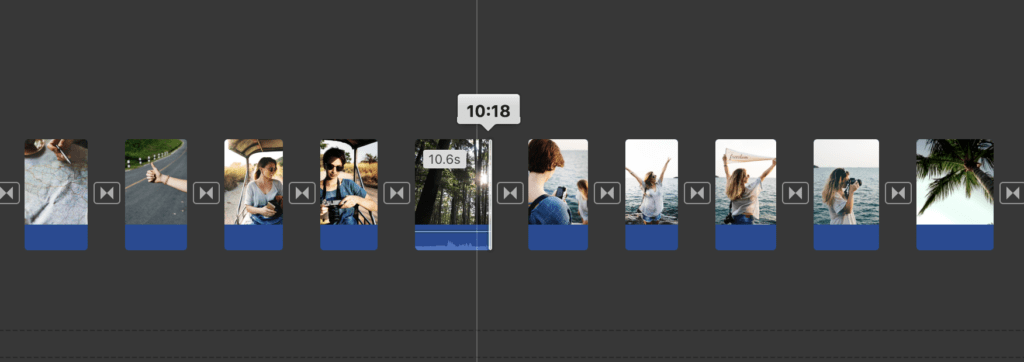
You can trim your video directly from the project timeline!
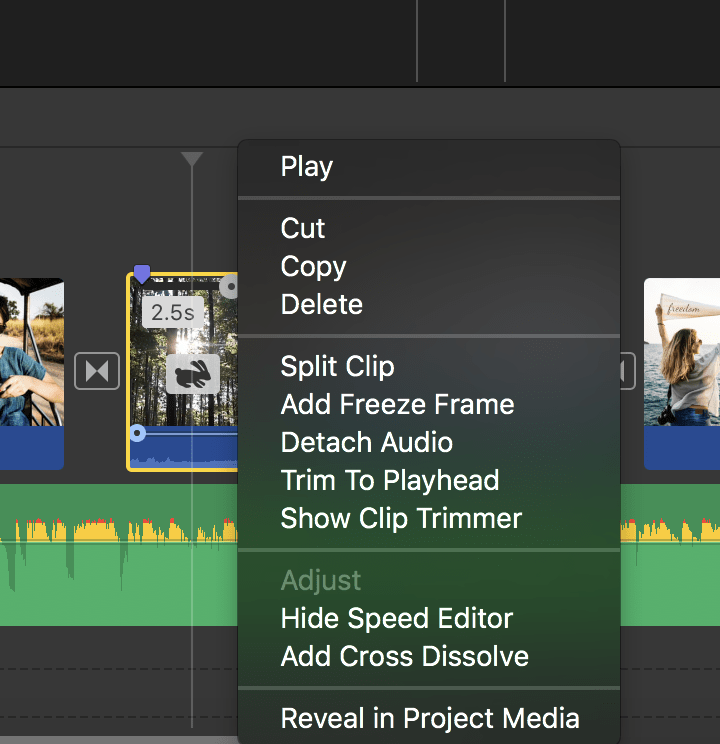
On the project timeline, you can also split a video clip into two different clips by moving the Playhead (white line with the arrow) with your cursor to the point where you want to split, clicking with two fingers, and selecting Split Clip (see below).
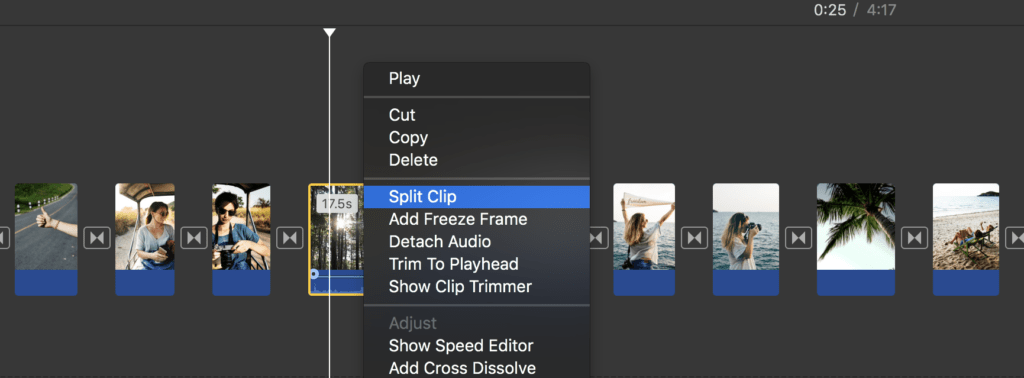
Split clips directly from the timeline!
#5 Add Motion to Stills
When you use photos in slideshows, it’s always nice to bring in some motion to still images. That’s what we call the Ken Burns effect. You probably know this effect from watching other slideshows already, but you might not know that the technique is named after a filmmaker who used it extensively in his documentaries. This panning and zooming effect can also be applied to video clips to add some further motion, especially to footage which is rather stable and focused on a single scene.
On the Project timeline, choose where you want to add the Ken Burns effect by selecting the right photo or video. You can select multiple photos and videos if you want to apply this effect to them all at once. Then, go for the Cropping option at the top of your Viewer pane and select Ken Burns. You’ll see two frames appearing on your photo or video – one marking the start of the effect and the other marking the end. Adjust these two frames in the way you want to see the effect start and end. Play your clip to see how it looks and adjust as needed. You can always reset all your adjustments if you need to do so.
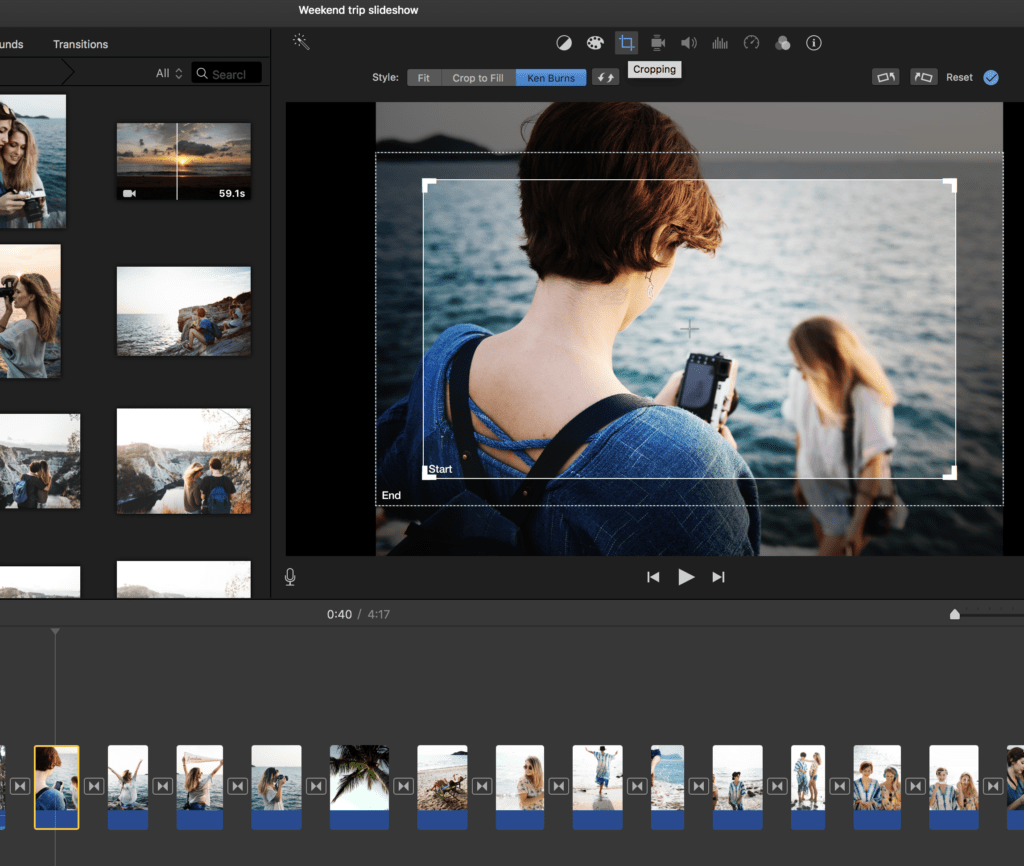
Using the Ken Burns effect can add interest to an otherwise stale image.
#6 Use Title Slides and Text
You might want to use title slides and text to mark the beginning and end of your slideshow, or to divide your story into chapters. Choosing some words and quotes that mean something to the audience can bring an extra emotional dimension to your slideshow.
To insert a title slide, select Titles from the top menu of the Browser pane, select the type of slide you want, and drag & drop it on the Project timeline. You can insert the text and adjust typography settings simply by double clicking on the slide from the Project timeline. Then you can write your text directly in the Viewer pane when the Title (T) button is selected. Click on the Info (i) button to adjust the duration of your slide. Most of the time, I like using graphics and photos with some catchy and relevant text rather than basic title slides. For this, have a look at some of the stock photo sites online, such as Pexels, or create your own text slide with a photo/text combination though a service like Canva or PicMonkey.
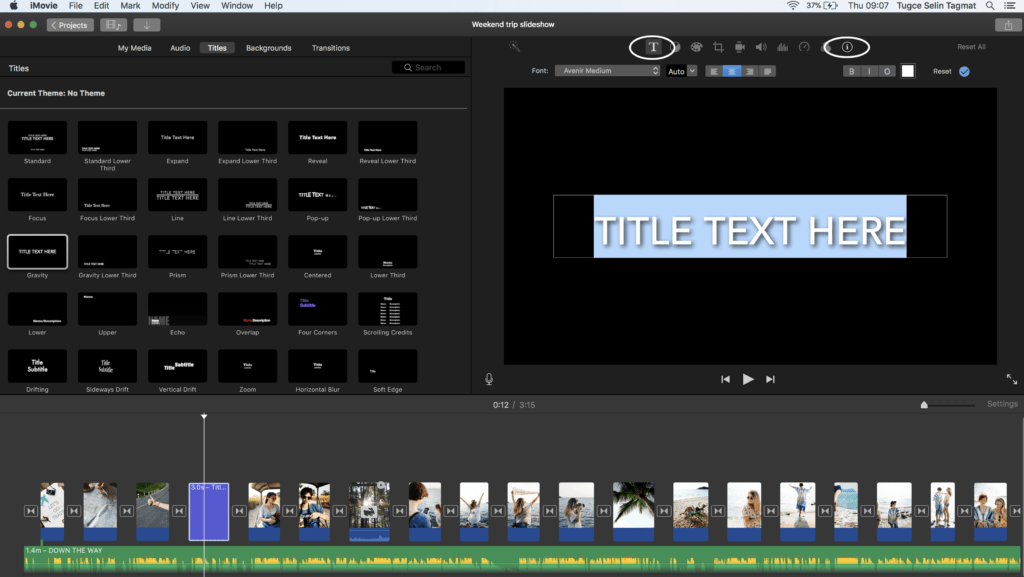
Use Title slides to enhance your slideshow!
#7 Add Transitions
Transitions are one of the main features that will help you create a professional-looking slideshow. On the top menu of the Browser pane, click on Transitions to preview the available transition options and select only one or two. I don’t recommend using a lot of different transitions one after another, as it distracts the attention and interrupts the flow.
If you want to create a simple, elegant, and professional-looking slideshow, the following transitions will be your friend: Cross dissolve, Cross blur, Fade to black, and Fade to white. Once you decide on a transition, you can easily drag and drop it between any two clips in your project timeline.
To watch how your transitions look, click on any photo or video on your timeline and push the space bar on your keyboard to view your slideshow playing in the Viewer. If you double click on the two white arrows between clips, you will see which transition you are using there. You can also adjust its duration, and apply it to the entire slideshow.
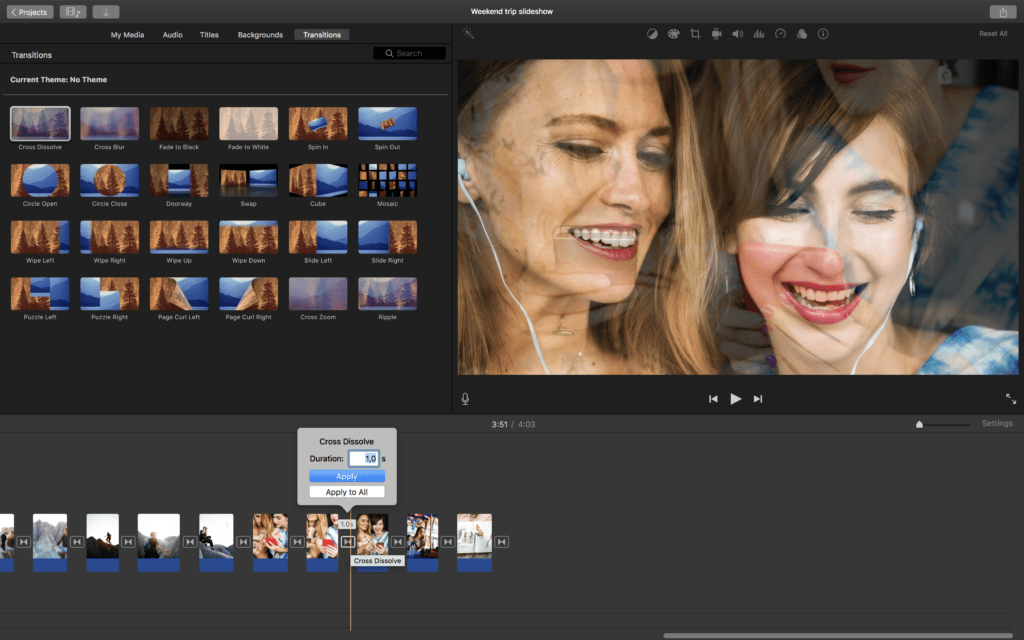
Use transitions for a professional look, but don’t go overboard!
#8 Import Music
If you aren’t sure how to choose the right type of music that matches the style and length of your slideshow + that’s royalty free, have a look at the tips in my previous blog post.
For this tutorial, I selected two instrumental pieces by audionautix.com with slightly different rhythms and bright, relaxing, and uplifting tunes – exactly the kind of feeling I wanted to create for the viewers of my slideshow. First, I downloaded the music files and then I transferred them into my iTunes account.
To import music for your slideshow, click on the Audio button at the top of the Browser pane, where you can either 1) select music from iTunes, 2) use sound effects, or 3) choose from your productions in GarageBand. Just drag and drop the music you want from your iTunes account to the project timeline. For my slideshow, I chose one fast piece (“Down the way”) that matched the lively first part of the slideshow, and one piece that had a medium pace (“Happy Ukulele”) that was perfect for the peaceful second part. Thank you audionautix.com!
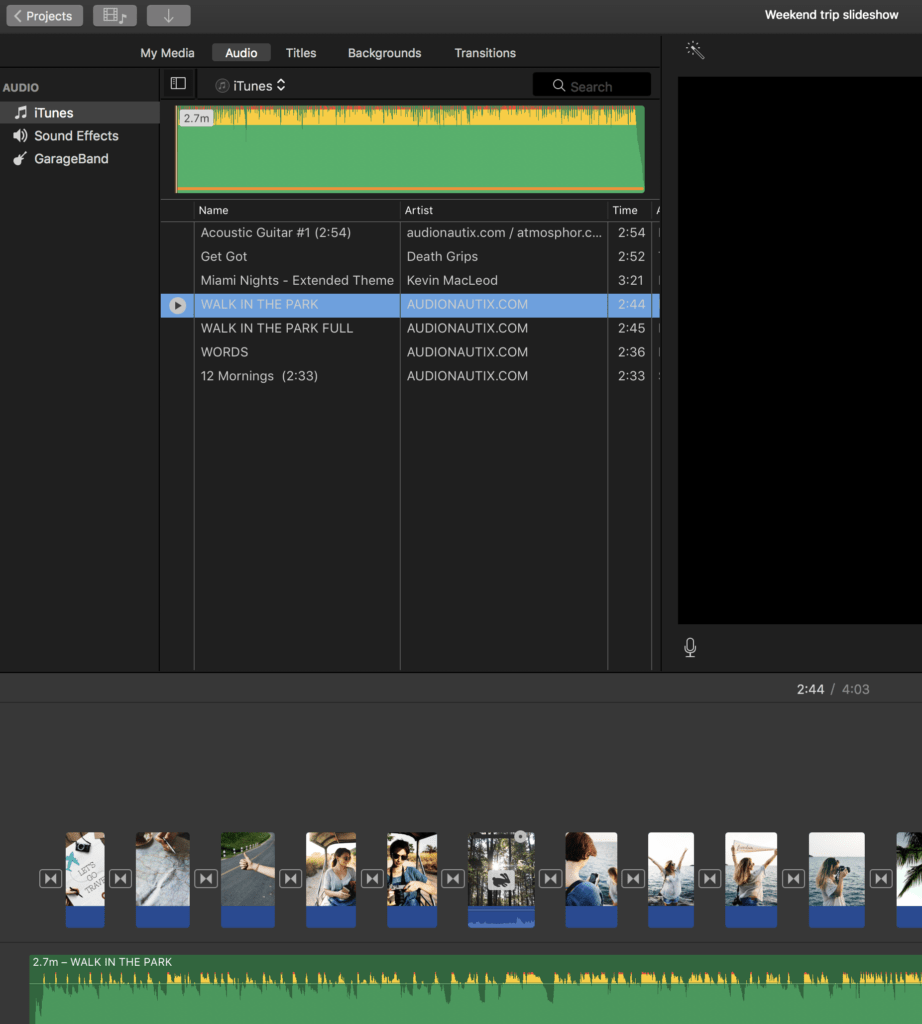
You can use sound effects, or import music from iTunes or GarageBand!
#9 Synchronize Everything
Unfortunately, iMovie currently doesn’t offer an auto sync feature (unless you have one of earlier versions that has Snap-to-beat function under its advanced settings), so you’ll have to find a way of doing this manually.
To be able to handle this in a practical and quick way, play your slideshow background music and identify the intervals of strong beats – basically where you would want to have your transitions. As you are listening to the background music, you can put markers on the photo and video slides by simply tapping on M on your keyboard. You don’t need to do this for the whole timeline, just for a minute or so, and then you can estimate the best duration for your slides. In some songs, the audio waveform in green clearly gives you clues. In my case, the best duration for slides looked like 2,5 minutes each with a one-minute transition in between them.
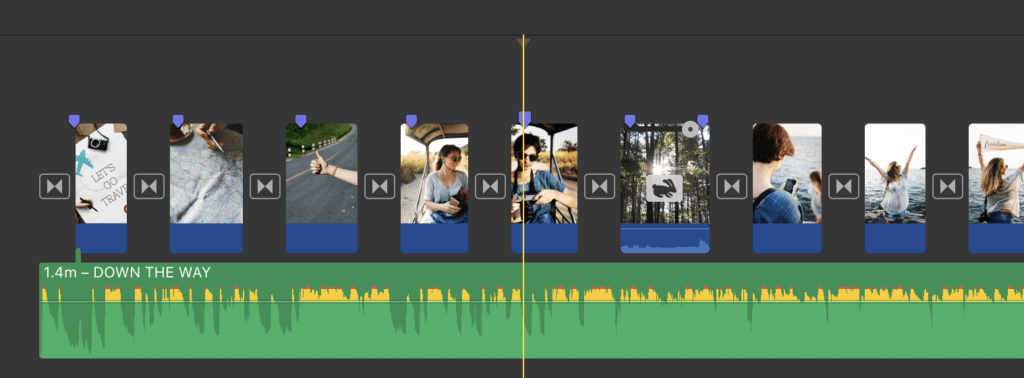
Use the waveform to look for a natural downbeat to help sync your slideshow manually!
Once you have estimated the best duration, click Edit from the iMovie top menu and select all the clips in the project timeline. Then, from the Viewer pane, click on Information (i) and change the duration for all slides in one shot. I suggest you do this for your photo slides first and then adjust video slides separately. After you have adjusted the duration for all slides, play your slideshow to see if there are any sync problems, and adjust the duration of a few slides manually if necessary.
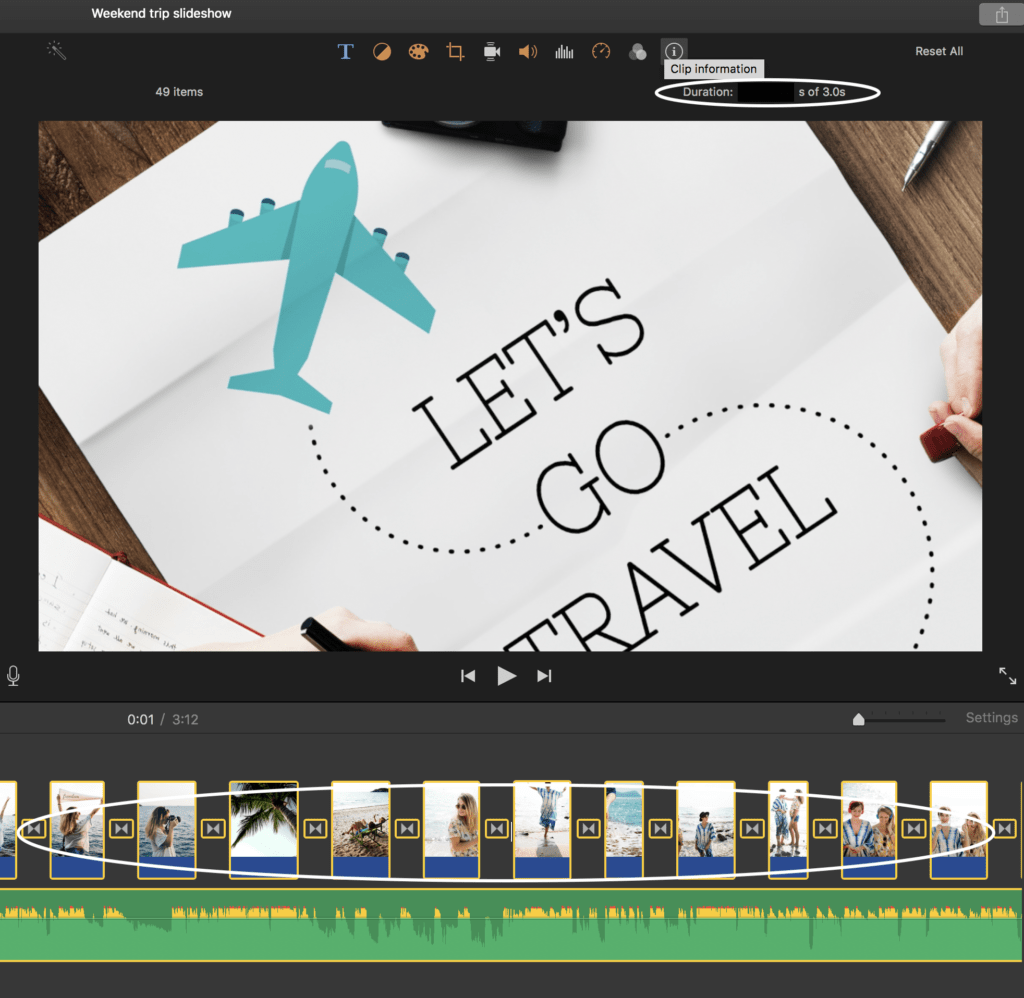
Fine tune your slideshow by adjusting the photo and video slides separately!
If you have audio in your video clips, you’ll hear both the background music and your audio playing at the same time. You need to make a decision here: is there any added value of having your audio together with the music? If you want to delete the audio from your video clip, click on your clip with double fingers and select Detach audio. Then you can click on the detached audio and delete it.
Rework the music selection around any audio clips in the slideshow!
You can also consider fading music in and out to make it a smoother transition. If you want to keep both your audio and music, but just want to adjust their volumes, select your video clip and click on Information (i) in the Viewer pane. Here you can adjust the volume of your audio and background music to achieve the best balance. In my above video clip, I wanted to keep the sound of birds singing in the forest along with the background music.
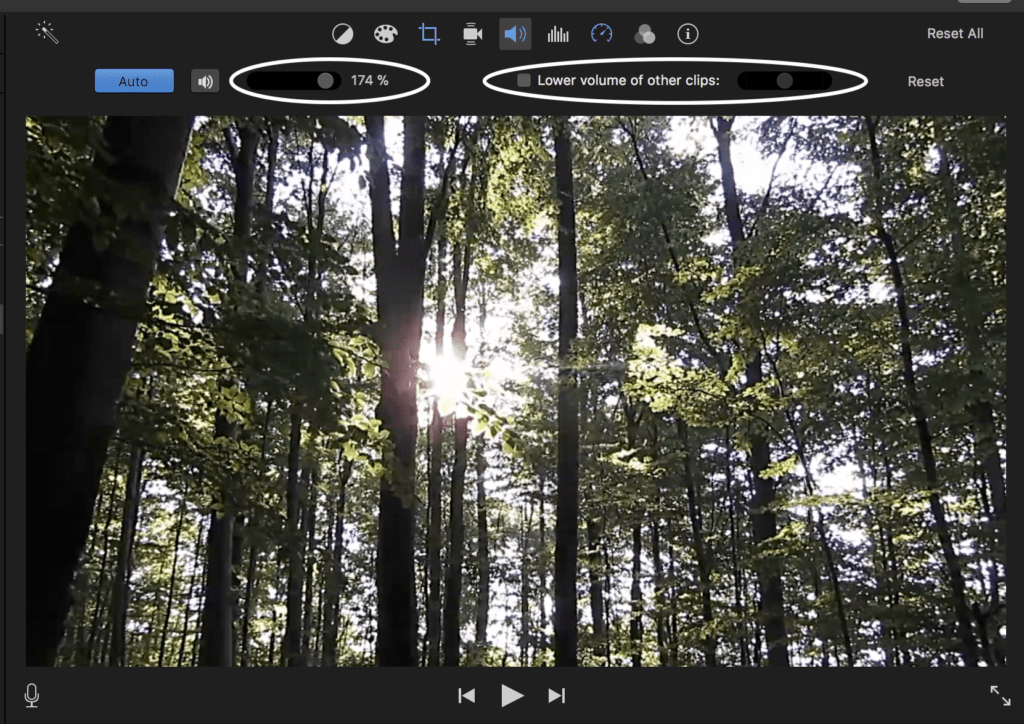
You can adjust the volume for every sound clip!
# 10 Export and Share Your Slideshow
Replay your slideshow a few times to review it and complete any fine tuning. Once that’s done, you’re ready to export and share your masterpiece!
In the main iMovie menu, select File / Share / File to export your slideshow. You also have the option to share your slideshow on Facebook, YouTube, Vimeo and iTunes. You can even share it by email, although that might be a less attractive option.
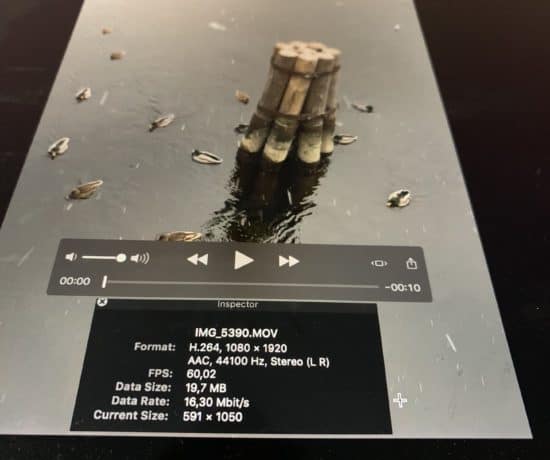
iMovie will export your slideshow as an mp4 file, which should be compatible with most of recent devices, but always check the device where you’ll screen your slideshow – in advance – to confirm that it’ll play. Tackle any issues that may arise up front, so you don’t get disappointed!
If you have an iCloud account, you can add your slideshow to iMovie Theater, and it will automatically appear on all your other devices, so you can easily watch your movies on your other computers, your iOS devices, and your Apple TV.
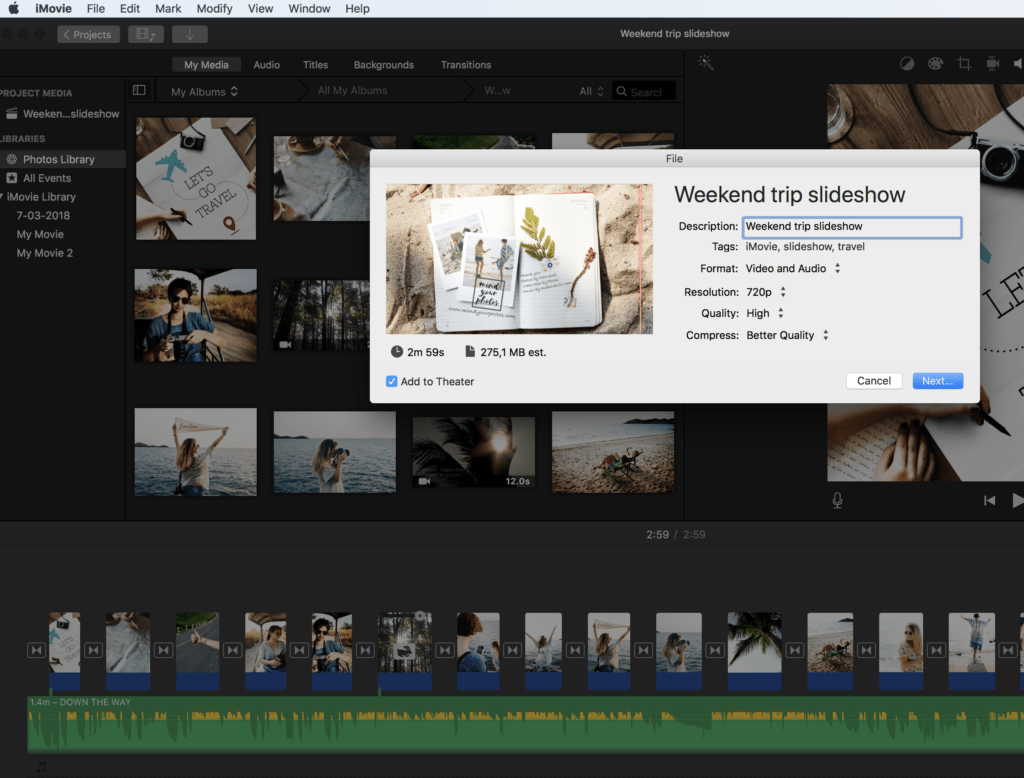
Use the File / Share / File command to export your slideshow.
For any slideshow to be displayed on a screen, I’d recommend going for an HD video format – no less than 720p and ideally 1080p. You can read more about video formats and resolutions in my blog post on best practices for organizing and managing your video collection. For screening your slideshows, the best quality and compression combination with relatively compact file will be with the above selected options. You can select different options and see how it affects the size of the file in MB. Take your pick!
Now Enjoy the show!
Tell Us, Dear Readers… Do you love iMovie too?
We hope this tutorial will help you to create lovely slideshows in iMovie. Think about your slideshow concept, draft an outline, prepare your content, and make the best use of iMovie‘s features to produce a photo and video slideshow that people will truly remember! And don’t forget to tell us how you did! We’d love to hear about it!
Featured Photo Courtesy of Selin Tagmat