
In our last blog post, we took a look at how to use Movavi’s new edition of Video Editor Plus to create easy videos of your memories. In this blog post, we continue the magic with their Photo Editor. Why? Well, simply because it has features that all of us family historians need, for example a simple way to do object removal and restoration. And since it’s wrapped up in a nice little software package, we just have to talk about it. Read on to find out exactly what it can do!
What is Movavi Photo Editor?
The name gives it away, but if you’re not familiar with Movavi’s photo editor, you need to have a look at it. Rather than being one of those complicated editors where you’d need to take a 60-hour course just to figure out how to open a file, this one gives you one-click options to a lot of things, which makes it an ideal first step for any beginner out there. To be clear, in this blog post, I’m reviewing edition 6, which may be slightly different to ones you have used in the past.
As I stated above, we (as family historians) often come across photos that need a bit of improvement…whether it be erasing a garbage can from the background of your family reunion shot or repairing some of those older photos that have cracks and creases in them. Movavi’s photo editor makes all of that easy, and since I’m all for keeping this simple and easy, we’re going to cover just how easy it is in this post. Let’s start with the interface.
The Interface of Photo Editor 6
When you first open the program, you’ll get a tutorial prompt that guides you through the user interface. I recommend paying attention to this if you are a beginner because it’ll familiarize you with where all the different buttons are located. There are only about 8 steps so it won’t take up a whole lot of your time.
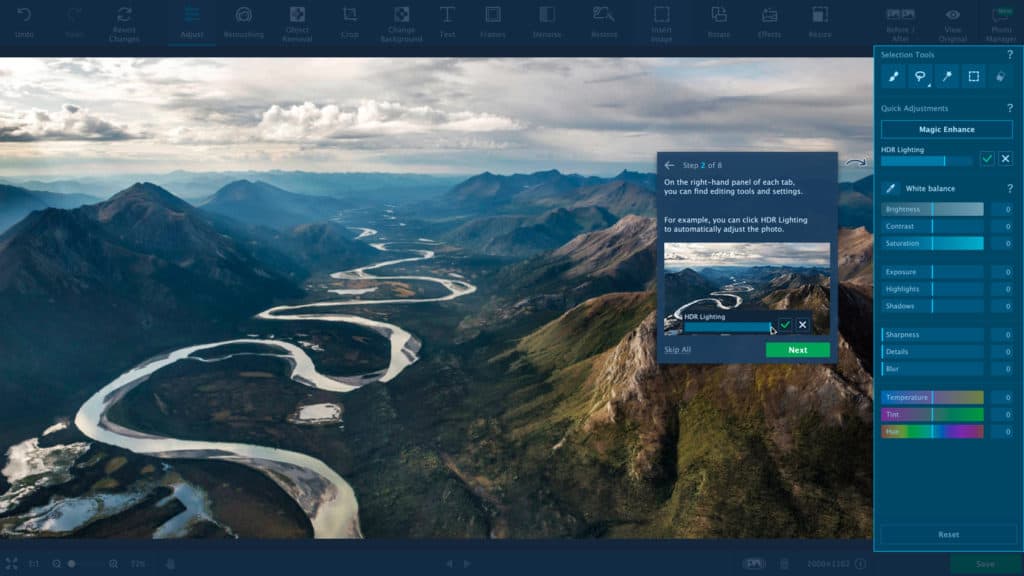
Photo Editor 6 has a tutorial that guides you through the interface!
Photo Editor 6 is set up like most photo editing programs. You have a menu at the top for you to take action on, the photo will be displayed in the window, and all the details / adjustment panes will be on the right side. What I like about it is that there’s only one button that clearly explains an action, so you won’t see a bunch of drop-down menus with options buried far down a long list.

I’m a Perfect Pinnable!
The Top 3 Ways You Can Use Photo Editor 6 to Improve Your Photos
Obviously, you can use this software to do any number of things, but we thought we’d outline the most useful purposes we think may apply to family historians. There are just 3 ideas to get you going, but I encourage you to experiment a little when you have the time. Once you get into editing photos, it can be quite addictive. 😉
1. Restoring Old Photos
Every family historian has a photo that has seen better days, and it’s so great to be able to use modern technology to fix things like cracks and creases digitally. Obvisouly, this requires that you have a digital version of your photo. If not, contact a scanning pro who can handle delicate photos and get a scan that won’t further damage your photo. Please note that we recommend using TIFFs instead of JPEGs if you’ll be editing your photos a lot (to avoid compression issues) – ask your photo pro or set your scanner correctly! Once you have a digital version, load it into this software to see the magic happen. If you can, work on a duplicate copy and save your original master file as scanned.
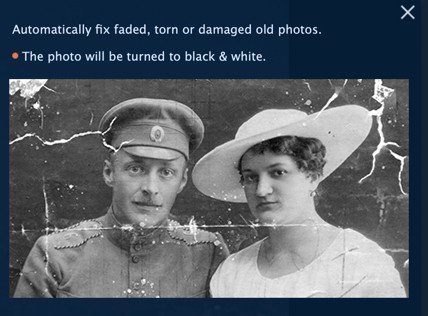
You can automatically fix faded, torn or damaged old photos.
With Photo Editor 6, you can automatically fix a lot of things with just the click of a button. Literally. The software has a button called “Restore,” and you can just click there to let the software try and fix things for you. It uses a smart fill algorithm to analyze and repair parts of the image that can be improved. It doesn’t always work perfectly, but since you can also go in and fix minor issues manually, that’s not such a big deal. There is also a way to colorize your old photo if you’d like to try that options with sepia or black & white photos.
Here is a video example of a restoration from Movavi’s Vlog:
2. Object Removal
Ever take a photo that was really good, except that it was ruined by a passer-by or something annoying, like a garbage can? This happens in public and crowded places a lot, for example at Disneyland where it’s hard to get that perfect shot in the time you have available. Well, fear not, because those things can be fixed in editing. Obvisouly, it’s always better to get a good shot from the beginning, but sometimes that just isn’t possible.
In Photo Editor 6, you can just the Object Removal tool to get rid of imperfections and cover up stuff that doesn’t need to be in your shot. This works just like in Photoshop, except the software helps you with the process. All you have to do is use the brush, magic wand, or lasso tool to mark the spot you want to touch up, then press start editing and the software will process the change for you. It’s best used on a continuous surface, such as on the beach pictured in the photo below where the colors are fairly even, or you may not get good results. But hey, it’s a simple solution that just might work for you, so give it a shot.
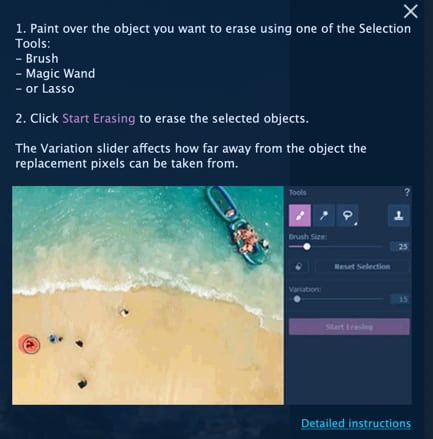
Use the Object Removal Tool to quickly get rid of distracting noise in your photo!
3. Make Yourself Look Presentable
Thank you!!!… is all have to say. I don’t look presentable on most days, so being able to improve my appearance when necessary is a relief. In photo editor 6, you can do things like smoothen out skin, remove wrinkles and imperfections, and fix red eyes. If you happened to forget your makeup bag on photo day, you can also add foundation, mascara, lipstick and whiten your teeth. No real bleaching required. 😉 And if you’re fashion challenged, you can even change the color of your clothes and your hair. Lots of fun. If you make a mistake, there’s a simple undo button, and you can also use the Before/After button to compare the edited version of your photo to the original. When you’re happy with your edits, save and export your photo.
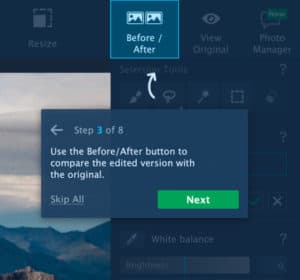
Compare your edited photo to the original with the Before/After button!
Download a Trial Version Today!
Can you do this stuff with other photo editing tools? Of course, but it requires more of a learning curve to get a handle on exactly how. What I like about Movavi’s products is that they simplify the process so that more people can have fun editing their photos. That’s why this program is great for beginners, and I think even pros could appreciate it for its simplicity. Retouching should be fun, and it’s not when you get frustrated, so in short, I encourage you to download a trial version of this software and test it out. It’s available for both Windows and MacOS, so you have no reason not to try it! And if you do, make sure to leave me a comment to let me know how you did!
What say you, readers? Have you tried Movavi Photo Editor 6? What type of stuff are you editing at the moment? Let us know in the comments below!
Featured Photo Courtesy of Rodolfo Clix


Teresa (fhtess65)
November 5, 2019 at 9:18 pmI was all excited, only to discover it’s Apple only 🙁
Teresa (fhtess65)
November 5, 2019 at 9:20 pmPlease ignore my last comment – I just found the Windows edition 🙂
Caroline Guntur
November 6, 2019 at 9:12 pmGlad you found it, Teresa! Movavi has editions for both operating systems for all of their programs. 🙂