

Photo Mechanic is a very popular tool among photographers and photo organizers with its amazing speed in viewing, organizing, managing and exporting photos. It’s a perfect addition to your photo organizing workflow! It’s also interesting for general users who want to keep their large photo collection well organized and need some time-efficient ways to do it. In this blog post, we will cover the Photo Mechanic basics to show how it can make your photo organizing process easier, so that you can decide if it’s for you.
What’s Photo Mechanic?
Photo Mechanic is an image browser displaying thumbnails of your photos instead of rendering all the full versions right away. Because of this feature, it’s very fast to view and manage large collections of photos. With Photo Mechanic, you can import photos from a memory card to your computer, copy and move photos between different folders of your operating system, browse and view photos. You can also implement basic editing functions such as rotating and cropping, adjust date and time of photos and rename them. By rating your photos, you can easily filter and cull them. It’s also possible to edit the metadata in such a way that will be compatible across different platforms.
There are some important points to keep in mind when you work with Photo Mechanic:
- It’s not a photo editor, so you’re best off using it in combination with your preferred photo editor, for example Adobe Photoshop or Adobe Lightroom. Need some ideas about how to pick the right photo management software? Check out our tips here!
- It directly processes the files from the folders in your operating system (referenced files), and it makes all the changes and edits directly to the original files.

I’m a Perfect Pinnable!
Downloading Photo Mechanic
Photo Mechanic is a paid software that offers a single user license with a one-time payment. Once you have the license, as a single user, you can use it up to three computers with MacOS or Windows.
At the moment there are two versions available: In this review, I used Photo Mechanic 6 that offers all the essential features for a general user. The newer Photo Mechanic Plus adds more powerful searching, filtering and organizing options to that. It also brings new features like catalogs and collections. The rest of the photo management process is similar between the two, except for some minor changes in terminology.
You can see the pricing for Photo Mechanic and download your preferred version here. Want to be sure if Photo Mechanic is for you before you pay for it? Then I would advise you to check out their one-month free trial.
Importing Photos
If you already have your photo collection on your computer, you can start working with Photo Mechanic right away. But for many users, and especially photographers, the first step to photo organization is uploading their files from a memory card to their computer. And that’s where Photo Mechanic offers a very powerful automation feature by making it possible to already start organizing photos during the transfer process.
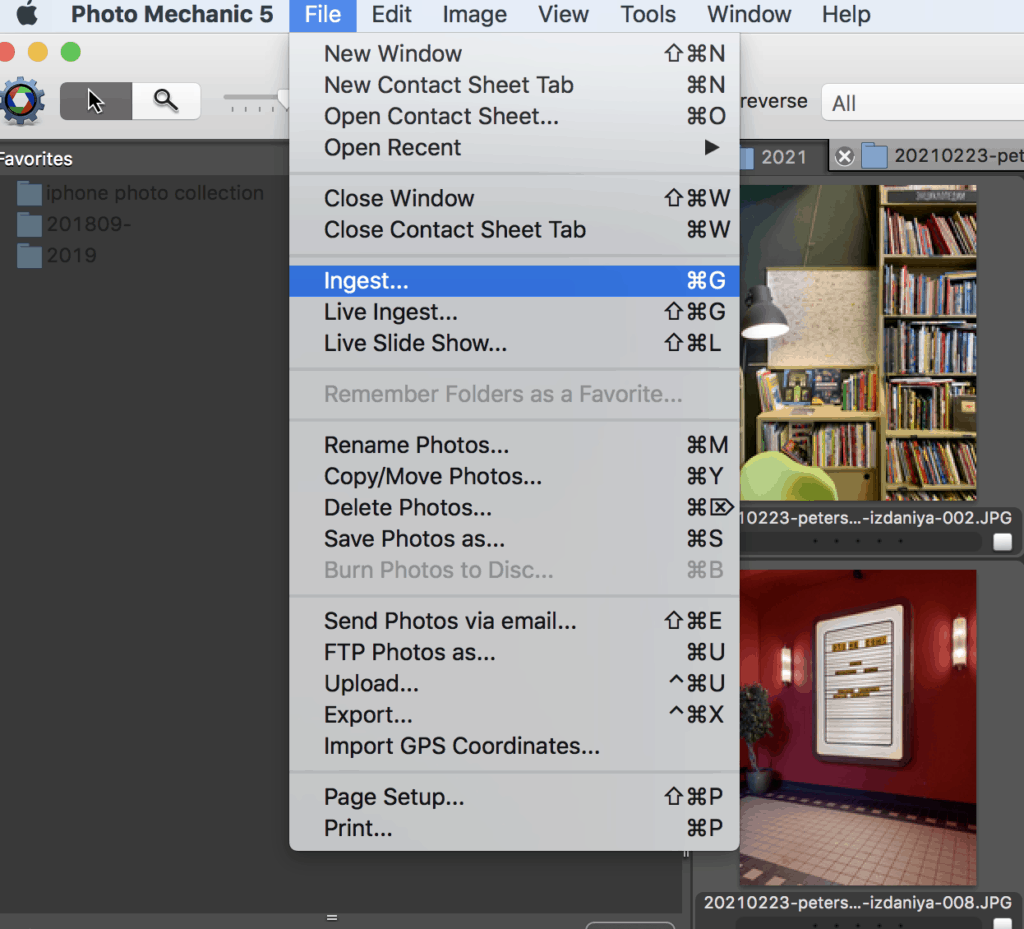
Photo Mechanic calls the process of copying files from a memory card to a hard drive “ingest.” Go to the “File” menu, and select “Ingest” to launch the Ingest dialog box.

From the Ingest dialog box, you should select the source disk where you want to import photos from (Source Paths) and destination folder where you want to import your photos on your hard drive (Destination Folder Roots).
The Ingest function also allows you to automate other actions such as batch renaming of ingested photos, filtering photos to be imported (such as RAW and non-RAW photos) and deleting the ingested photos from the memory card. You can check here to learn how to use advanced features of Photo Mechanic’s Ingest feature.
Browsing Your Photo Collection
Photo Mechanic is best known for its photo browsing speed. Therefore, knowing how to browse your photo collection and switch between your folders is key to using it.

When you launch Photo Mechanic for the first time, you will see more or less an empty window with a menu at the top and navigation tabs on the left.
Photo Mechanic views your folder structure on the left under the Navigator. If you think that you will use some folders frequently, you can just drag and drop them from the Navigator to Favorites. Then you can access them directly by clicking on them from Favorites next time. No loss of time to find them in your folder structure again!

From the Navigator on the left, browse the files on your computer and select the folder you want to work on. Photo Mechanic views the photos in the selected folders as Contact Sheets.
You can select multiple folders at a time and switch between them from different tabs at the top of the contact sheet currently on view.
Viewing and Editing Photos
On the Photo Mechanic contact sheet, you can view and edit single or multiple photos.

When you click on a single photo, you have the options to rotate the photo, make a preview with a crop function and access the IPTC panel to edit the metadata.
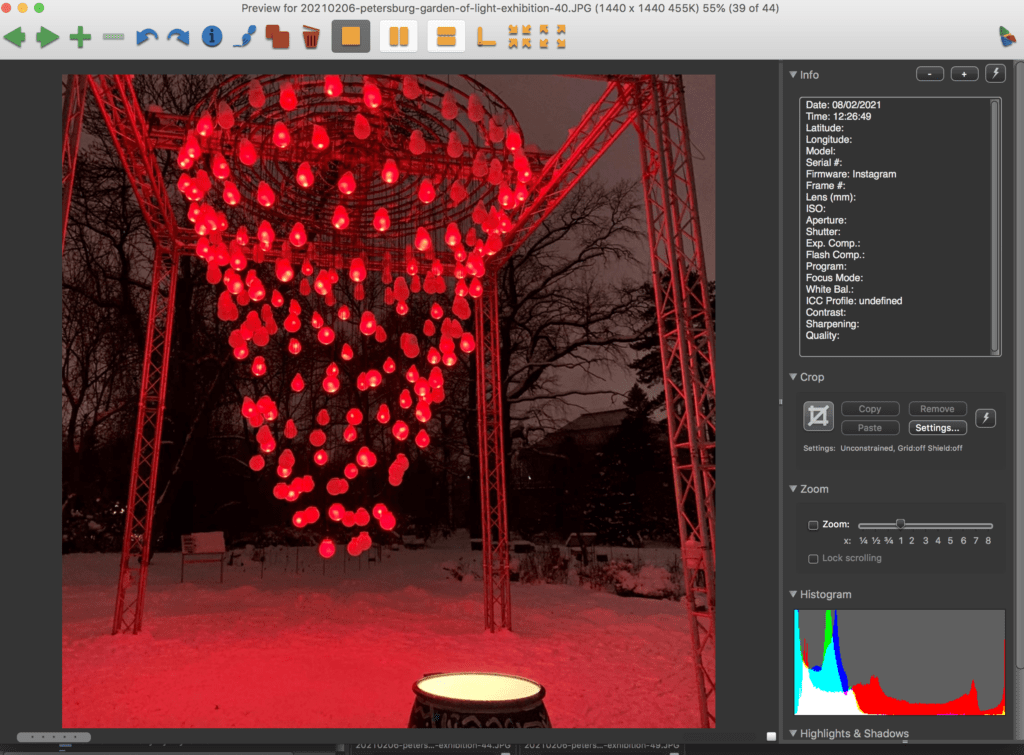
The preview window offers information like date, time, camera features and cropping options.

The IPTC panel offers the possibility to insert captions, keywords and copyright information.

To select multiple photos, simply click on the photos by holding the Command key on Mac or the Control key on PC. Once you make your selection, right clicking will show you further options such as deleting, copying and renaming selected photos.
Always remember that any action you take on your photos are implemented on the original photo collection on your computer, so when you delete a photo on the Photo Mechanic contact sheet, you also delete it from your computer.
One of the handy features of Photo Mechanic is to be able to view two photos side-by-side. This way it’s easier to decide which photo is better to keep.

To view two photos together, first double-click and preview a photo, select the yellow icon at the top showing the two photos aligned horizontally or vertically and then select the second photo from the contact sheet.
Moving, Copying and Renaming Photos
Photo Mechanic makes it very easy to batch rename photos. You just need to select the photos you want to rename, right click and tap on “Rename selected photos.”

When you tick the sequence box, all your renamed photos will be numerically ordered by automatically adding a number at the end of their name. The number you insert here indicates the number where the numerical order starts.
As you browse through your photo collection, you might want to copy or move some photos to other folders. You can do this directly on the contact sheets.

Select the photo or multiple photos and then go to File and click on Copy/Move Photos.

You can copy/move your photos to a newly created folder or select another destination from your folder system. You can rename your photos at the same time that you copy/move them.
Adjusting Capture Dates and Times
Photo Mechanic offers a few ways to adjust the capture dates and times depending on the different situations. You can adjust them for a single photo or a batch of photos.

Select a photo or multiple photos, go to Tools and select Adjust Capture Dates and Times.

On Photo Mechanic, you can adjust the date and time relatively for each photo or you can change all photos to have the same date.
You can change the date and time two ways:
- By inserting the amount of time to be adjusted in the Adjust Relative feature section, you can adjust the date and time relatively for all photos either backward (-) or forward (+).
- By selecting an exact date in the Absolute Adjusted Time, you can change the date for all photos. If you check the box to “use the adjusted time for all selected photos”, this specific time will be the capture time for all photos. Otherwise, Photo Mechanic will keep the original “capture times” of photos, while setting the same “capture date” for all.
Culling and Sorting Photos
Culling means basically going through your photo collection and narrowing it down to the best images you want to edit and use. It saves time when organizing and editing your photos by bringing forward the best photos in your collection and getting rid of the rest, so that you can enjoy your memories to the fullest.
On Photo Mechanic you can cull and sort your photos by tagging, color classing, and rating. Launch the program and select the folder to open your photos that you want to work on as a contact sheet. Then, you will easily tag, color class or rate your photos directly on that contact sheet.

On the contact sheet, click on the bar below the file name (or tap with double finger) and select the color class you want to assign your photo. The bar will take that color once you assign it.

If you prefer using star ratings, you can directly click on the stars on the bar below the file name and select the number of stars.

For tagging a photo, just tick the small checkbox at the right bottom of the photo.

Click on “Edit” from the main menu to filter your photos by tag, color class or rating.
If you use Adobe Lightroom for editing your photos, you can consider culling your photos quickly with Photo Mechanic and then importing them to Adobe Lightroom. If you adjust your settings, you will have a smooth transfer of your tags, color classes, and ratings from the former to the latter. See Photo Mechanic’s external compatibility with Adobe Lightroom here.
Adding Metadata
Managing the metadata of your photos also goes fast with Photo Mechanic, which makes it possible view and edit metadata for a batch of photos. It uses the IPTC (International Press & Communications Council) system and embeds the metadata into your image files so that they will follow your photos around, no matter where they go.

To view and edit metadata, select a photo or multiple photos, go to Image and click on IPCT Stationary Pad.

Insert or edit the information in the metadata fields and tick the boxes for these fields. Once you tap on “Apply Stationery to Selected”, Photo Mechanic will revise all the fields that you ticked, for the photos you selected.
So What Do You Think About Photo Mechanic?
We hope this tutorial was helpful for you to get a general insight about how you can make use of Photo Mechanic in your photo organizing projects. Do you find the features of Photo Mechanic interesting? Would you consider adding it to your workflow? Maybe you’re already using it and want to share your experience with us? We will be happy to hear from you, just share your thoughts in the comment section below!
And don’t forget that if you want to learn the ins and out of Photo Mechanic more in detail, it’s one of the programs we teach inside of DPO PRO: The Ultimate Photo Organizing Masterclass!


