A big part of not having to cull your photo collection for hours and hours on end is to take great shots to begin with, right? Obviously, you don’t have to become a professional photographer in order to have a great photo collection, but how you take your photos may just help simplify your process as a whole. Today, we welcome the wisdom of Stefanie Descheemaecker, who shares with us four key components of a great photo process! Enjoy!
Streamline Your Photo Process
Even if you are an inveterate photographer, when you don’t have a streamlined system, photography can quickly transform from an enjoyable pursuit into a stressful undertaking. Misplacing photographs, repeating edits, and missing out on the high quality shots you want can be a downright awful way of improving your photography skills. Unfortunately, too many people put up with these results, even though many of the effects can be severely reduced with a productive workflow.
If you are ready to improve your photos (while decreasing stress!), here are four tips to help you streamline the photo process:
1. Embrace the Shot List
Before you start snapping photos, you want to get into the habit of creating a shot list that documents what you want to obtain throughout the session. Depending on what you are shooting, the shot list will vary, but it might include any product features that need to be highlighted, or facial expressions and moods you want to capture in the portraits or elements of a
landscape on which you want to focus. You get the idea.
How to Create a Shot List
The best way to create a shot list that works for you is first to write out your list of camera shots and then group the camera shots by setup. Once you have these detailed, reorder the setups into the most efficient plan of action. By taking the time to organize your tasks before the shoot, you will be able to begin the photo-taking session with a clear idea of how it is going to proceed. It will also give you time to assemble any props you need, investigate any questions you may have, and coordinate with others who are involved.
Keep your shot list close by during the shoot so that you can refer to it and update it as the day progresses. Never again will you finish the session only to find you forgot to take a vital shot!
2. Get to Know Your Camera (Really) Well
While it may seem like an obvious point, too many people rush through the learning-about-your-camera stage and then wonder why they aren’t able to capture the style or quality of images that they desire. If there is anything that professional photographers know, it’s that the camera is only as good as the person using it. You can spend thousands of dollars on photography equipment, but if you don’t know how to utilize it under different settings and in various scenarios, then it’s not going to be much of a tool.
Keep in mind that the process of learning to use your camera can be a long one, so don’t expect it to happen overnight — instead, schedule time to play around with the features and enjoy the learning curve. This will prove invaluable when it comes time to do your own thing during a shoot.
Learning Your Camera Helps the Process
First and foremost, sit down and read the manual. This is a surefire way to learn the most about your camera in a short period of time. Even if you are more of a “learning-by-doing” kind of person, reading the manual will help point you in the right direction. Doing so will also help you to familiarize yourself with your camera menu, and the functions that apply to your style of photography. Memorize where all the buttons are to the point that you can handle your camera without thinking.
Put Your Knowledge to Work
Once you have studied the basics, it’s time to put your knowledge to work and shoot in a variety of settings. You want to spend time shooting in low light so you can practice using your camera’s ISO settings. Practice shooting in different light settings so that you know what to do when your shot is backlit, as well as when a subject has mainly light or dark tones. The purpose of this activity is to determine how your camera’s meter responds to varying lighting conditions.
Test your camera’s autofocus feature as every model has different capabilities in this regard. Ideally, you will learn to shoot manually, but you still want to know how to switch between autofocus modes, and how good your camera is when taking photographs of moving subjects. Learning all of this takes time, but it’s time well spent.

3. Learn How to Batch Edit
There is nothing that can prove more time-efficient for a photographer than learning how to batch edit their shots. Knowing how to implement your edits to a whole series of images will save you a significant amount of time as you won’t be required to make the same tiny adjustments over and over again. Not only that, but by finding an editing style that works for your photographs and then using it across all of your images, you will formulate a harmonious look across the collection that will bring a wonderfully cohesive look to your work.
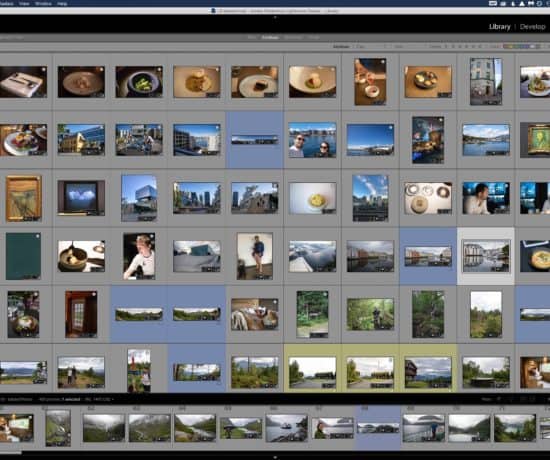
Batch Editing in Lightroom
Many professional and amateur photographers opt to use Lightroom to edit their photos, and the program makes it easy to start batch editing. In Lightroom, you have two options for batch editing: either applying a preset, or copying the edits you have made to a photo to the rest of your work. The first option is the fastest way to batch edit, but the second one gives you a lot more control over the outcome of the images. If you opt for the latter option, you would edit the first image and then copy and paste the edits to the other photos. By implementing this process, you can stop being inefficient and ensure that the editing process is as streamlined as possible.
4. Have an Organization and Back-up System
One of the most anxiety-inducing aspects of photography is being able to locate the photo that you want amidst the thousands that you have saved (enter your photo organizer!). If you are someone who has a collection stored on your iPhone, others up in a cloud, a couple of hard drives shoved into a drawer, and filled memory-cards — then you know this anxiety all too well. The problem with not organizing your photos is that you are significantly increasing the chance that they are going to get lost, deleted, or forgotten because they aren’t correctly stored nor backed up. No matter what you are photographing, it is devastating to find out that you have lost precious memories and beautiful captures. You can’t back up your photographs unless you have them organized, which is why this step is so crucial.
Organization Facilitates Backups
Once you have an organization system in place, backups are much more likely to follow. As soon as you have finished shooting, get in the habit of transferring all of your photographs from the memory card into a titled folder on (at least) one hard drive. After that, back it up. It’s recommended that you save your images on three separate sources: a master working drive, a current backup of the master drive, and a complete historical archive, stored in a different physical location from the other two backups. This is known as the 3-2-1 method of backing up.
Master the Workflow
Understand that to master your photography workflow, you have to start somewhere – no matter how overwhelming it may seem. To begin transforming your process, recognize the areas that need the most improvement and work on each aspect step-by-step. It comes with time, but you’re better off the sooner you start! Best of luck!
What tips and tricks have you picked up in order to streamline your photography workflow? What challenges are you currently facing that you need help with figuring out? Let us know in the comments below!
Featured Photo Courtesy of the Creative Exchange
Join the Community!
Subscribe to get our latest content by email. You will also get occasional notifications about new sales and promotions.
Please read our Privacy Policy!