It’s no secret that we LOVE iMazing here at OrganizingPhotos.net. Why? Because it’s a quick and easy way to transfer all your digital media between your Apple devices (like your iPhone) and your computers. We often recommend it for beginners because it’s so intuitive to use. That’s why we wanted to write up a little tutorial so those of you who haven’t tried it yet will understand how it works. And…because September is “Save Your Photos Month,” we’ve got a special treat for all of you – a giveaway! Thanks to the good folks over at DigiDNA (the makers of iMazing), we’ve got 5 licenses to give away this month, so after you read the tutorial, be sure to enter the giveaway and try your luck! Woohoo!
Sync, Backup, Repeat?
One of the most important aspects of keeping your photo collection neat and tidy is to identify the best transfer/sync/backup system that suits your needs, and sticking to a good routine. A widely used option is an all-in-one photo management system, like Apple Photos or Google Photos, to sync your all your devices and automatically back up your photo library to the cloud. However, there are a few good reasons to occasionally use a manual system to transfer your photos between your phone and computer.
Sometimes what you need is to transfer only a part of your photo collection, rather than transferring and backing up everything automatically. This is when a simple transfer system will come in handy. Maybe you want to avoid the cloud storage for privacy or cost reasons? Or perhaps you want to keep your photos in a native core folder structure rather than count on Apple’s and Google’s Photos libraries to do the job. If so, good news! There are great apps that can help you to transfer photos manually across your devices.
Some of Our Favorite “Basic” Transfer Methods
Here are some of the basic transfer methods we recommend trying out, especially if you’re a beginner:
iMazing
iMazing (the app we’re highlighting in this article) is a powerful and user-friendly app that you can use to transfer your photos manually between your iOS devices (iPhone, iPad and iPod touch) and your Mac/PC. It’s actually more than a photo transfer app because you can use it to backup your phone and also transfer your music, messages, files, and other data from your phone to your computer.
Image Capture
Did you know that Mac has another native app other than iTunes that you can use to transfer your photos from your Apple devices to your Mac? Image Capture is a very simple app that helps you select and transfer single photos, multiple photos, or your whole camera roll into a folder that you create on your Mac. If you want to avoid iTunes and Apple Photos, this can be a good option for you.
AirDrop
Want to quickly share photos with your Apple-loving friends within bluetooth or Wi-Fi range? Then just go ahead with select photos from your camera roll or Apple Photos app, tap the share icon at the bottom left, and select a nearby device using the AirDrop option. Want to learn more about this option? You can find some tips and tricks on AirDropping here.
PhotoSync
If you have an Android device, you can look into PhotoSync, which is another app we love. It transfers, backs up, and shares your photos and videos between iPhone, iPad, Android devices, computers, and cloud services.
To give you an idea about how any of these apps can make your life easier, below is a tutorial on how to transfer your photos between your devices with iMazing. This is a powerful app that stretches well beyond photo transfer management, and we highly recommend it whenever the need arises!

I’m a Perfect Pinnable!
An iMazing Photo Transfer in 5 Steps
Curious about how iMazing works? Here are the 5 steps you need to take the first time you use the app. After that first time, you’re only 3 steps away from a smooth transfer!
Step #1 – Get the iMazing app for your computer
Download iMazing for Mac or PC and install it in your computer.
Note that when you install the iMazing free trial, you will have a photo transfer limitation (up to 50 photos), but that unlocks when you make a purchase. Feel free to play with the app first though to see if it’s for you.
Step #2 – Connect and Pair Your Phone
Once you launch the app, it will ask you to connect your Apple device to the computer so it can make the connection. When you’re using the app for the first time, you’ll need to pair your device with a wire connection to your computer. Your phone will ask you to confirm if you can trust the computer with your passcode. Just accept and continue.

Connect your Apple device to your Mac or PC and iMazing will automatically recognize it.
Once your device is paired, you’ll always see you device on the iMazing sidebar and you can use a wireless connection if you prefer that – as long as your computer and the paired device are both connected to the same wireless network. Note that a wired connection always works faster, so if you have a large collection on your phone, go for the wired connection.
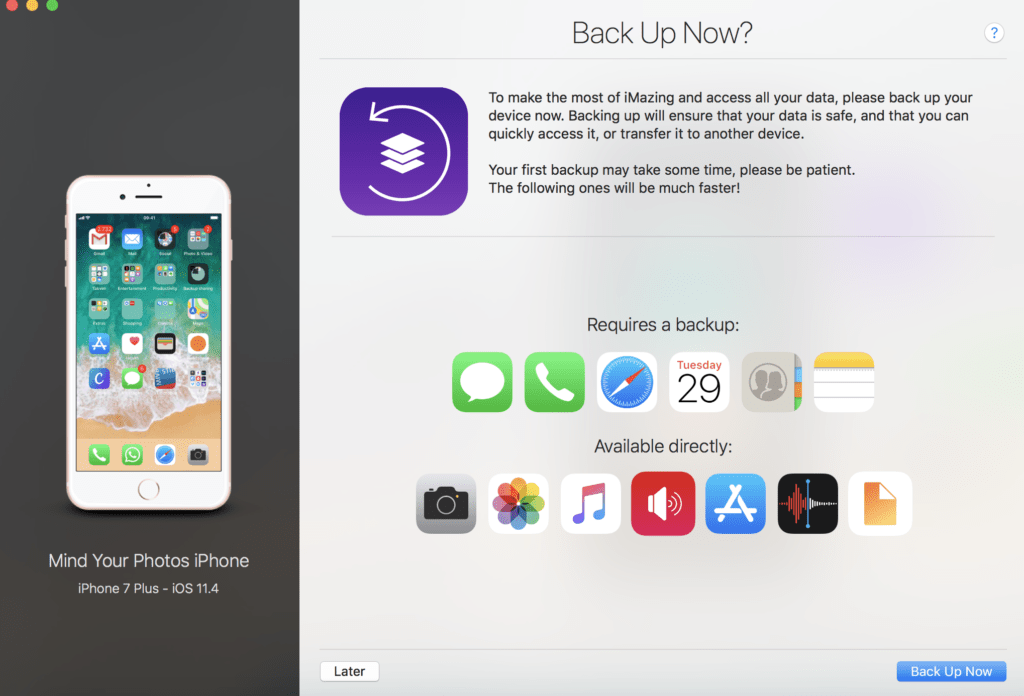
Once your device is paired, you will see this window offering you the option to backup your device. To simply transfer your photos, click on “Later” and skip this step.
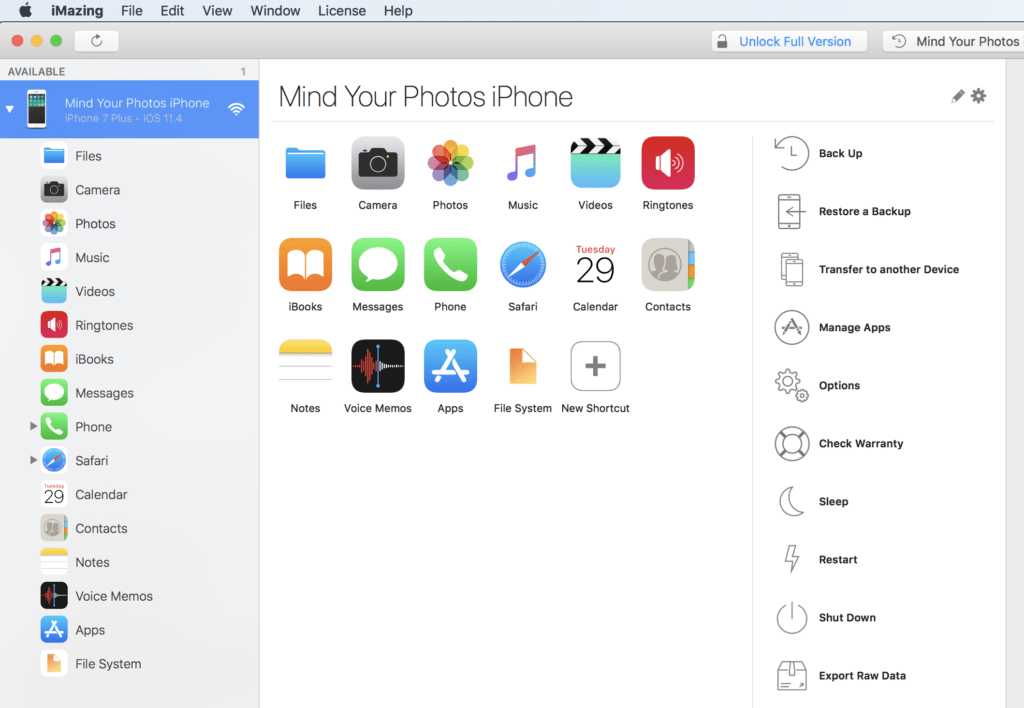
This is iMazing’s main window. To use a wireless connection next time, click on “Options” from the right side bar and enable the Wi-Fi connection.
Step #3 – View Your Albums and Photos
Select Camera or Photos from the left sidebar to view the photos that are stored on your device. If you have multiple devices paired to your computer, select the device that you want to work with first.
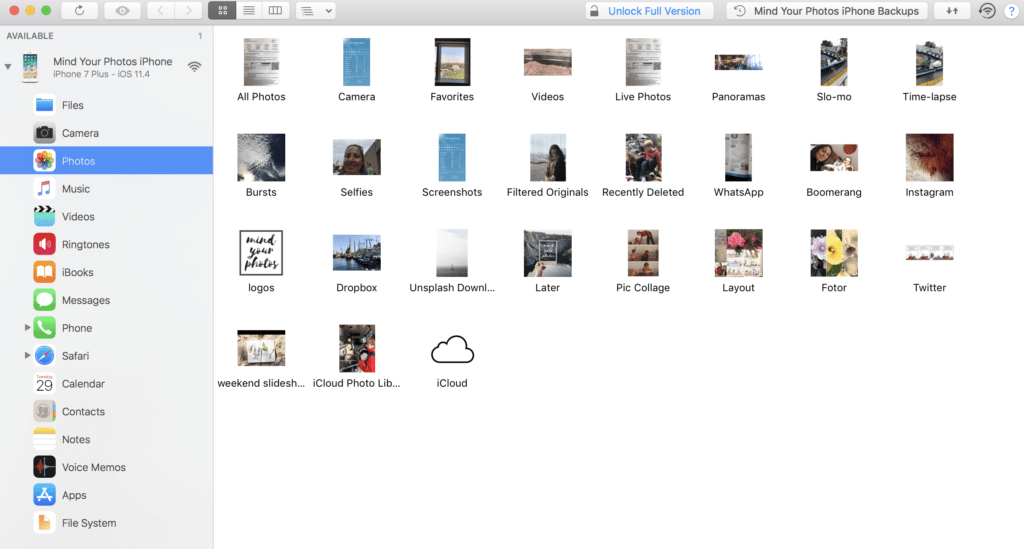
If you click on “Photos,” you will view thumbnails of photos organized with the Apple Photos albums. If you click on “Camera,” then you will view thumbnails of photos from your camera roll.
Step #4 – Drag and Drop
From iMazing’s Photos or Camera window, you can simply drag and drop photos to your computer. iMazing will make the transfer accordingly. And it works the other way too. You can drag and drop photos from your computer folders to an album under iMazing’s Photos window. If you drag a photo in an existing album in the Photos window, iMazing will transfer the photo to that album. If you drag a photo on the Photos window that lists the albums, iMazing will ask you to create a new album and transfer your photo into that new album. You can select and transfer a single photo, multiple photos or an album/folder by using this drag and drop method.
Step #5 – Import and Export
Besides simple dragging and dropping, there is another way to transfer your photos between your devices and computer (by which you can browse the folders easily):
- Click Import to browse your computer’s folder structure to select and transfer your photos to your phone
- Select a photo or album in iMazing’s Camera or Photos windows, click on Export, and browse your computer’s folder structure to decide where to transfer the selected items
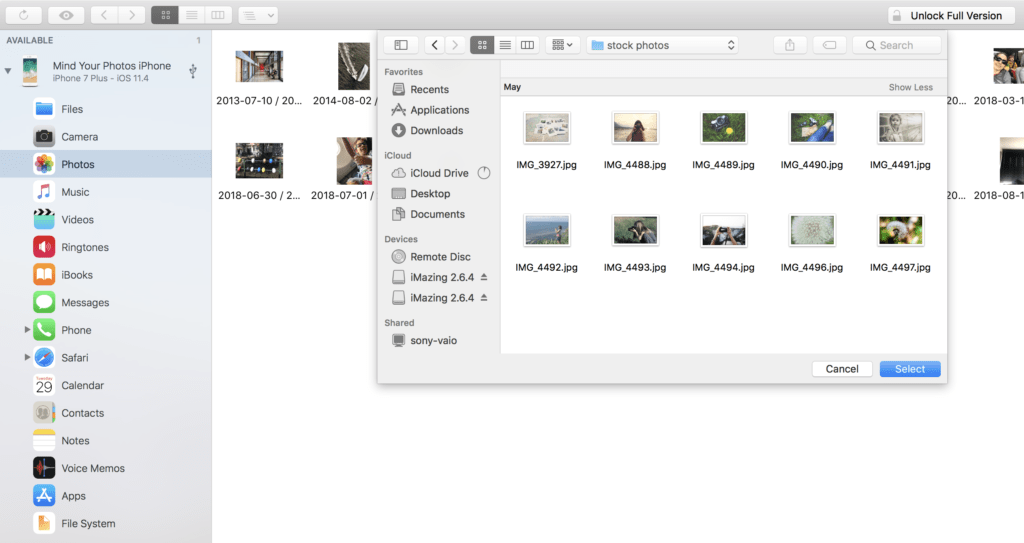
See Import and Export options at the bottom right. Once you select one of them, you will see the browsing window appearing above.

Transfer in progress!
After you select the photos and choose the location, iMazing will transfer your photos with the same resolution and embedded metadata between your devices. iMazing shows the progress of the operation on a pop-up window. When it’s completed you will see those photos in the other device.
iMazing Bonus Tips
iMazing has several features that can help you save time, so here are are few of our favorites:
Tip #1 – Batch Deleting Photos off Your Camera Roll from Your Computer
Short on space? iMazing can batch delete photos off your iPhone’s or iPad’s camera roll after you’re done transferring them. Note that you aren’t deleting photos from Apple Photos with iMazing but from the camera roll, so they will disappear instantly once you hit the button. Your photos won’t go into the “Recently Deleted” Apple Photos album. Use caution when deleting your photos, so you don’t make a mistake. This can be a very handy feature if you’re trying to batch delete in one step rather than in groups.
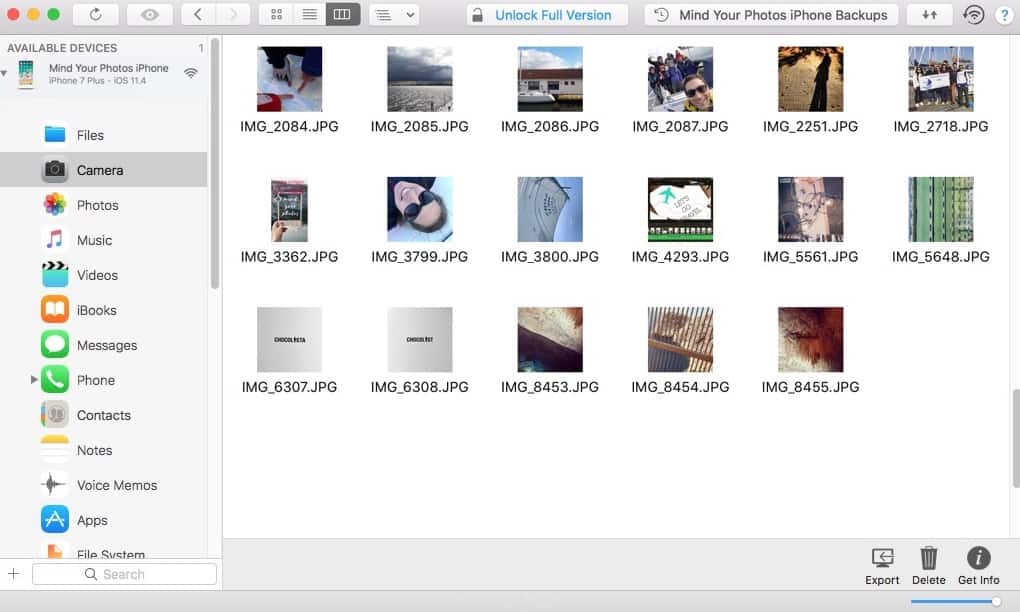
Just click on “Camera” from the iMazing sidebar, select the photos you want to delete, click on “Delete” at the right bottom of the window and confirm that you want to delete photos from your camera roll. That’s it!
There are a few known limitations regarding photo transfer management on iMazing, so if you see that an operation has failed, it usually has something to do with your device settings. An example would be if you have iCloud enabled on your mobile devices. In this case, deleting photos won’t work and iMazing will notify you that it can’t edit or delete your photos on your phone because of the on-going syncing. iMazing has an FAQ page here to help you through these types of issues. Many of them are just photo safety precautions!
Tip #2 – Browsing Your Photo Files
iMazing allows you to browse through your files, including photos. You can browse your photo folders by clicking on File System from the left sidebar.

As you are browsing your photo and video folders, you can select them and copy to your computer by simply clicking on the Copy to Mac or Copy to PC button.
Tip #3 – Converting HEICs to JPEGs
iMazing gives you the flexibility to keep the original format of your photos, or convert HEIC files to JPEGs during the transfer process. This can be super handy to do, if you’re looking for the more compatible format.
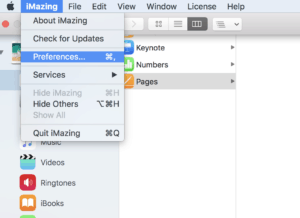
Select Preferences from the iMazing main menu.
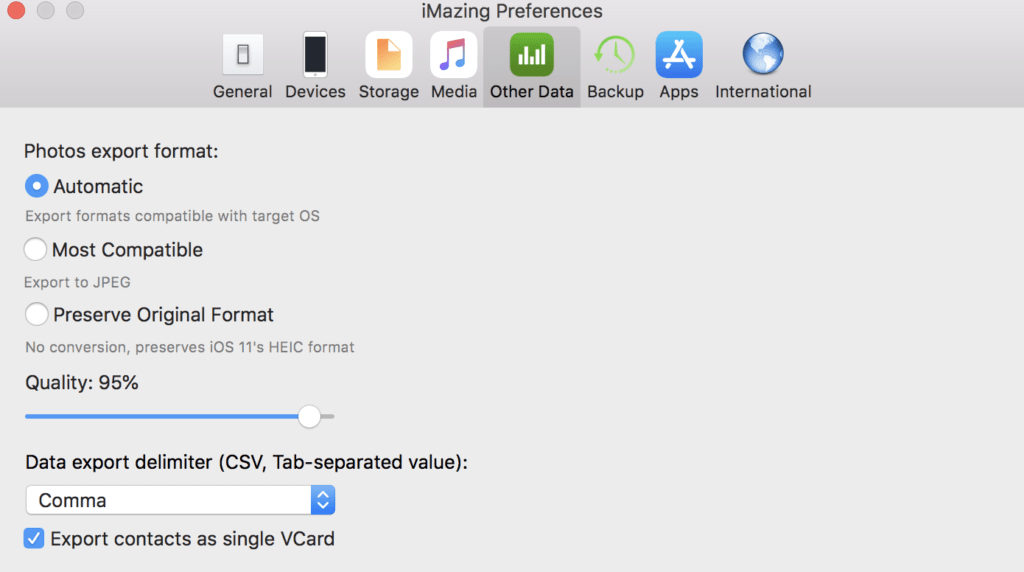
You can set the export format as automatic, JPEG or original format.
iMazing also offers a free HEIC Converter, which is Mac/Windows compatible and can help you convert HEIC format to JPEG after the fact. You can also remove EXIF data from your photos with this converter. Yep, it’s that easy. We love it!
Ready to Transfer Some Photos Manually?
As you already know, we do love our syncing, but there are times when you just need to transfer a few things, and in those cases, iMazing offers you an easy process! I hope this blog post provided you a good overview about iMazing and other tools available for managing your photo transfers manually. Select the best tool that suits your needs and give it a go! Get those photos and videos backed up!
Want to try iMazing? Enter to Win our Giveaway!
Thanks to DigiDNA (who created iMazing), we’ve got 5 licenses to give away! And even if you don’t win, there’s a consolation coupon in it for ya! Enter below!
Featured Photo Courtesy of DigiDNA