We continue our video series with a tutorial on Shotcut, a free video editor that you can use to create great photo & video slideshows. We have already covered how to create slideshows in iMovie as well as in Microsoft Photos, so be sure to look at those two posts if video is something you’re passionate about! Enjoy the read!
What is Shotcut?
Shotcut is a free, open source, cross-platform video editor for Windows, Mac, and Linux. This software in interesting because it’s widely considered an alternative for Windows users who are looking for a free video editor with advanced features.
Following the discontinuation of Windows Movie Maker last year, Microsoft added slideshow features to their native Photos app, but they weren’t enough to fill the void. If haven’t already tried the Microsoft Photos app, take a look at the previous blog post on how to create a photo and video slideshow in Microsoft Photos to see if it can do the work for you. If you end up agreeing with us, however, check out Shotcut to see if it’s more along the lines of what you are looking for – it just might be.
Shotcut has a Learning Curve
Beware that you will have a steep learning curve with Shotcut as the features are somewhat hidden from plain sight. It’ll also be challenging to handle extensive video editing projects as Shotcut isn’t as flexible as I’d like it to be; sometimes when you want to change and adjust content, it doesn’t behave as expected. Having said that, once you learn how to use it, you can create a nice and professional looking slideshow for personal, modest-sized projects.
For this tutorial, I tested Shotcut for both Windows and MacOS. For Mac users, I find Apple’s free video editor iMovie to be more powerful and user-friendly, especially because it has batch editing features. I have previously written on how to create a photo and video slideshow with iMovie for Mac here.

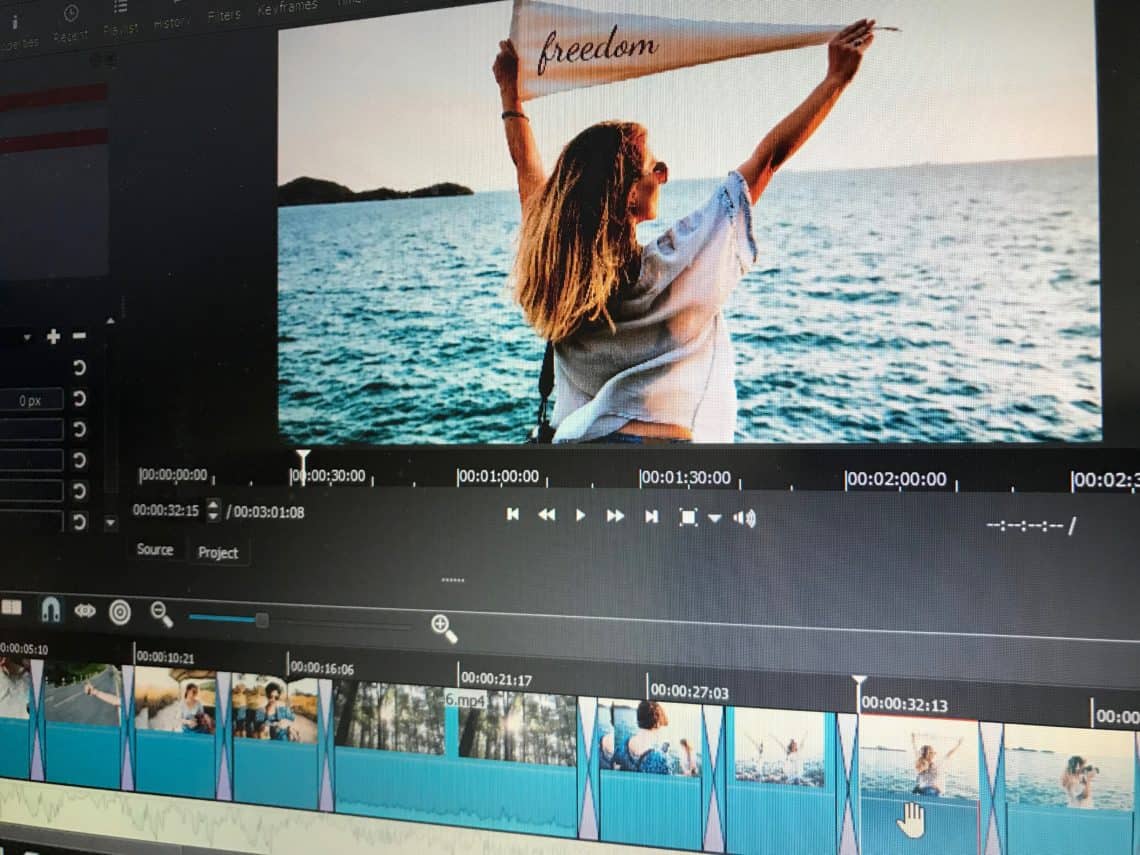
I’m a Perfect Pinnable!
How To Create a Slideshow with Shotcut
Here you go – follow these steps to create a photo and video slideshow with Shotcut:
Step #1 – Get Your Slideshow Content Ready
Before you actually start creating your slideshow, prepare – decide on your slideshow concept. Think of an outline, and curate your content accordingly. If you haven’t done so already, I recommend reading my basic tips and tricks on how to make the best out of photo and video slideshows before creating your slideshow.
For this tutorial, I prepared a slideshow to share some weekend trip photos and videos with friends in a fun and uplifting style. It came out to be 43 photos and 3 videos. I decided the video should be around 3 to 4 minutes long and would be formatted appropriately to be shown on a home TV screen.

I saved all photos and videos that I wanted to use in this slideshow in a dedicated folder in numerical order based on the outline in my mind. This let me import all the content to the video editor in the right order.
Step #2 – Download and Install Shotcut
Visit the Shotcut download page, select the best option for your operating system, download, and install. For this tutorial, I tested Shotcut version 18.06.02 by downloading the 64-bit Windows version on my PC and the 64-bit MacOS version on my MacBook Pro.
The Shotcut Interface
When you start Shotcut, you’ll see a basic screen similar to that of other video editors: a top left window where you can browse the content and various features (Browser window), a top right window to preview the video (Preview window) and at the bottom, the Timeline of your video project.

Be sure to browse the menu items to have a general idea about available features before getting started with Shotcut as the interface is not as intuitive as those of other video editors…
In the top menu, you can manage various viewing options and editing features (File, Edit, View, Settings, and Help). The toolbar just below the main menu provides shortcuts to the most basic and frequently needed controls (Open File, Save, Undo, Redo…). You can open and close it from the View settings on the Main menu.
To be able to easily view and manage basic editing features during the slideshow creation process, I recommend you to go to View on the top menu and ensure that Toolbar is displayed. Then, either from View under the main menu or directly from the Toolbox, ensure that Properties, Playlist, and Filters are displayed by clicking on them.

When Properties, Playlist and Filters options are displayed, you’ll be able to see them as shortcuts at the bottom of the browser window.
Step #3 – Import Your Photos and Videos
Now it’s time to import your content to Shotcut and start creating your slideshow!
Click on Open file and find your content folder. Choose all the photos and videos that you want to add to your slideshow, and click on Open to import them into Shotcut. Wait to proceed until you see that all the content has been imported.

Import your media all at once. It’s easier.
Once imported, you’ll see your photos and videos on the Shotcut playlist in the top left window. What I like about Shotcut is that once you import your content, it keeps it in order based on the file names (in my case, the numerical order). That isn’t the case with, for example, the Microsoft Photos app video editor, which mixes up the order and requires some additional work to organize the content.

Don’t forget to save your project!
Now is a good time to click on Save, so you don’t lose your video. Name your project and Shotcut will save it as a MLT XML file.
Remember to regularly save your project throughout the editing process. Shotcut autosaves your project once in a while. Once you save your project, you can stop and continue your editing later by launching Shotcut and opening your project by clicking on Open file. If there is an autosave after you last saved your project, Shortcut will ask you whether you want to resume from the last autosave or not.
Step #4 – Create a Timeline
The next step is to add the content from playlist to timeline to be able to edit your slideshow.

Add all the content to your slideshow right away.
Click on the menu to display additional actions, and select Add all to timeline. This way, all the photos and videos that you imported will be added to the slideshow timeline.

This is how you see the content; in the form of a timeline at the bottom of the Shotcut screen.
Step #5 – Arrange Photos and Videos
Once all your photos and videos are on the timeline, you can preview the slideshow at any stage of the editing process by using the Preview control buttons. Throughout the editing process, be sure that the Project option is selected at the bottom left of the Preview window. This means that you are working on the timeline and not on the source files.
To be able to play your slideshow from the very beginning in Preview, ensure that the playhead (white vertical line with arrow at the top that indicates the current position) is on the first slide. If you double click on the first slide on the timeline, it’ll bring the playhead to the beginning.
Get Organized
Organize your photos and videos to have a good flow of your slideshow story:
- Want to get rid of a photo or a video? Simply right click and select Remove.
- Want to add new content? Click on Open file, fınd the content you want to add, and click on Open to import them to Shotcut. Wait until you see all the content imported. If you don’t see the new content appearing in your playlist, click on “+” to add the source to the playlist. This way your content should appear in your playlist. Then drag and drop the new content from the playlist to the timeline.
- Want to change the order of your content on your timeline? Simply drag and drop them to their new position.
Step #6 – Editing
There are a few editing options in Shotcut worth noting, such as duration, fit to screen, motion, transitions, and text. Let’s looks at each of them:
Duration
When you add your content to the timeline, Shotcut sets the duration for each photo to 4 seconds by default. If this duration synchronizes well with your music, you’re in luck. Unfortunately, adjusting the duration in Shotcut isn’t all that easy if you have already started your editing workflow.

You can adjust the positioning of your content in Shotcut.
To adjust, click on the photo on your timeline and then select Properties from the bottom menu of the browser window. You can then see the duration of your photo. Unfortunately when you want to adjust the duration of the photo during the slideshow editing process from the properties menu, it just doesn’t work. So you need a alternative here.
Before adding all the content to Playlist and Timeline, just import one photo to Shotcut and click on “+” for it to appear in the Playlist. Then select this photo and click on Properties. From there, you can change the duration and set it as default. From then on, whatever content you import into the Playlist and add to the Timeline will have this default duration whether you continue working or shut down and resume later.

Adjust the default setting for duration before you start editing your project!
Improvement Needed
I would really appreciate more flexibility in adjusting the duration of clips during the editing process without going back and forth, which would make synchronization work more practical. However, this is the way it works on Shotcut at the moment. The best way to make it work is to have an idea about what music to use during an earlier stage, so you can set your default duration for clips at the beginning. And even if the duration that you initially set for the clips isn’t precise enough to match the music, you can still work around it by adjusting the duration of transitions later on. This will take time for sure as batch editing is not available.
Fit Content to Screen
To have a nice and professional looking slideshow, it’s better to fit your photos to the screen and remove the black bars that may appear (on either side of your footage). You can do this by using the Position and Size feature available under Filters.

Select a photo on your Timeline and then select Filters from the menu at the bottom of the browser window.
Select Video filters and find the Crop filter from the drop-down menu. Then select Center. This will fit your photo to the screen. If you want to position your photo differently, you can deselect Center and make the adjustment yourself by clicking on the Top, Bottom, Left and Right options to manually crop your clip at various proportions. As there is no batch editing option in Shotcut, you have to do this for each photo manually.

Add Motion to Stills
It’s always a good idea to add some motion to your slideshows with panning effects. When your photo is selected on your Timeline, select Video filters from the drop-down menu and select Size and Position. In the drop-down menu of Presets, you’ll see available options for adding motion to your photos. You can select and preview to see how it works.

Add motion to your stills with panning effects.
Apply the panning effect to all your photos manually. You can use the same or a few selection of motion effects. The simple the better.
Add Transitions
To add a transition between two clips, simply drag one of them onto the other. You’ll see a transition box appear:

Once you drag a clip onto another one, you will see the crossed transition box appearing.
When a specific transition box is selected, go to the Browser menu and select Properties. From there, you can select from a range of transitions available. The transition effect is by default Dissolve.

Add Text
You can also add text to your photos or videos. To add text, select Text from the drop-down menu for Filters, add your text, and select where you want the text to be displayed on the screen from the Preset.

You can add text where necessary.
Step #7 – Edit Your Videos
To trim your videos to a desired length, you have two options. If you want to trim a clip only from the end, you can do that directly on the Timeline. To cut both from the beginning and the end, you have to select the video on the Playlist (the only possible way to do it in my version of the software; check your version to see if it’s possible).
To trim from the end, find the clip on the Timeline. When you select the end of the video clip, you’ll see a red line appear. Move it towards the left to trim your video clip. That’s the easiest way to do it.

You can trim from the end of the clip directly in the Playlist.
To trim from both ends, find the video in the Playlist. Select the video clip, right-click, and select Open as clip. Trim your video from the arrows available in the Preview window. Remember that this action is not reflected on the video clip you have on your Timeline, so you have to replace the clip in timeline with this trimmed version for it to work.

Open the clip separately to trim it from both beginning and end, and don’t forget to replace the original.
Shotcut has several advanced settings for videos under the Properties and Filters tabs for those of you who want to discover further editing features.
Step #8 – Add Your Music
Your music choice for your slideshow is very important for getting across your emotional message to the viewer. Also make sure that you use royalty-free music, especially if you will play your slideshow to a bigger audience. To know more about how to make the best music choice for your slideshow, check out my previous blog post.
For this tutorial, I chose one fast piece (“Down the way”) that matched the lively first part of the slideshow, and one piece that had a medium pace (“Happy Ukulele”) that was perfect for the peaceful second part.

Thank you audionautix.com for the slideshow music!
To add music to your slideshow, go to the Timeline menu and click Add audio track, which will add an audio timeline below your video timeline.
Add your music files to Shotcut playlist by clicking on Open File, finding your files, and adding them. Then simply drag and drop your music to the relevant place in the Audio timeline. Ensure that your music starts from the very beginning of the timeline, and if you have two music tracks, match the start of the second with the end of the first. If you see green gaps between them, you can simply right click and select Remove to delete them.

This is how your Video and Audio timeline should like like when you add the music.
Step #9 – Synchronizing Everything
In Shotcut, synchronize your music and content manually. To be able to handle this in a practical and quick way, play your slideshow background music and identify the intervals of strong beats – basically where you would want to have your transition between photos and videos.
In this case, the ideal duration for each photo was 4 seconds and the multiple of 4 seconds for videos. This includes the transition time in between the clips.
The most practical way to synchronize everything is to import the music immediately after importing the content and doing all the transition and trimming work together with the music for alignment.
#10 – Export Your Slideshow
Once you are happy with your slideshow, click on Export from the Toolbar to export your video project. The export menu is quite extensive and overwhelming, but you can basically go with the default settings and just click on Export File.
If you go with the default settings, your slideshow will be exported in mp4 format. In my export window, you’ll see the resolution as 1920 x 1080. That is the 1080p (true HD) resolution that I can display with good quality on a home TV screen. You can follow the progress of your exporting process from the Jobs window on the right.

There are quite a few exporting options in Shotcut, but you can stick with the default settings for most jobs. if in doubt, choose 1080p (true HD).
Share Your Slideshow with Others
Now it’s time to share your slideshow with others! Send it to your friends and family! And check out the slideshow that I created with Shotcut below! Enjoy!
Start Small
My best advice for anyone who will use Shotcut is to start with baby steps. Rather than importing all your content and editing in bulk, divide your content into smaller chunks, import it into Shotcut and check if all works well first. Try the properties and filters, as well as the export feature, to see if everything works properly in your operating system and that you’re happy with the result.
This free open-source platform isn’t like most other video editing interfaces in that it’s less user friendly at a glance. I came across several challenges as the workflow isn’t as straightforward as I’m used to, so just take it slow when you are starting out. That way you can avoid spending extra hours editing your content and instead focus on making the best slideshow possible!
What say you, readers? Have you tried Shotcut? How did you like it?